This week's newsletter from the Beaverton Farmers Market is all about the colorful, luscious pears you'll see lovingly displayed in vendors' market booths, and I thought this one was so simple and uncomplicated that it deserved sharing here.
Decadent Pear
"Marketgoers love his apples, but they also love him for his amazing pears," wrote Market Master Ginger Rapport of Thompson Farms' Lynn Thompson. "Lynn is always welcoming and was happy to share his favorite pear recipe which he lovingly calls 'Decadent Pear.'"
4 sweet red pears 4 Tbsp. of brown sugar 4 Tbsp. of butter 4 strips of bacon, fried until crisp then crumbled
Halve the pears and hollow out the centers.
Spoon 1/2 tablespoon each of butter and brown sugar into each half, and microwave them for a minute to soften the pears.
Top with crumbled bacon and broil for a couple of minutes to crisp up the glaze.
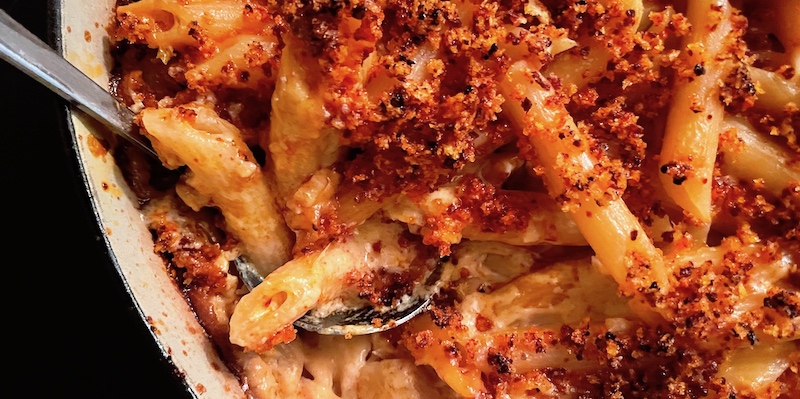
It was like a tingling between my shoulder blades that I couldn't quite reach. The niggling thought in my brain had been amorphous at first, as elusive as a phantom, but it had the unmistakable flavor profile of the homemade gochujang from my friend Denise's family.
It was even a little scary, a crossing of lines if you will, kind of like the kimchi risotto that I made during the pandemic, trying to use what was in our pantry so we didn't have to make a trip to the store. But with this there wasn't that excuse, since I had everything on hand that I would need. Plus, really, the likelihood of an inedible culinary disaster was remote—my family will pretty much eat anything, exclaiming "tasty!" as they chow down.
So, to cut to the chase, an attempt at making gochujang mac'n'cheese had been on my mind for awhile. Sure, I've made various iterations of the classic cheesy noodle casserole from versions laced with salmon, Dungeness crab, pimento cheese, even one with a Tex-Mex twist. But a Korean-inflected version somehow seemed like a bridge too far—call me a drama queen, but it gave me the willies.
Maybe it was the idea of combining cheese with the chiles, fish sauce, sesame oil and miso in the gochujang. But we'd been making kimchi quesadillas—with cheese and the pickled, chile-laced cabbage—for lunch since I'd been making my own kimchi. What was there to be nervous about?
When I ran across a mention of a panko, gochugaru and sesame oil topping that would give the top a nice crunch, suddenly the clouds cleared, the sun came out and all seemed right with the world. I'd still caution the curious to be aware that this is not your mother's mac'n'cheese or anything that Annie or Mr. Newman would put in a box, but it's pretty awesome, if I do say so myself.
Gochujang Macaroni and Cheese
For the topping: 3 Tbsp. Panko 1 Tbsp. gochugaru 2 Tbsp. toasted sesame seeds 1 Tbsp. toasted sesame oil 1/2 tsp. salt
For the casserole: 1 lb. dried pasta (we like penne or rigatoni) 4 Tbsp. butter 4 Tbsp. flour 1 Tbsp. garlic, minced 2 c. milk 8 oz. sharp cheddar cheese, grated 8 oz. cream cheese 3 Tbsp. gochujang Salt and pepper to taste
Bring a large pot of salted water to boil.
While water is heating,combine the topping ingredients in a small bowl. Set aside.
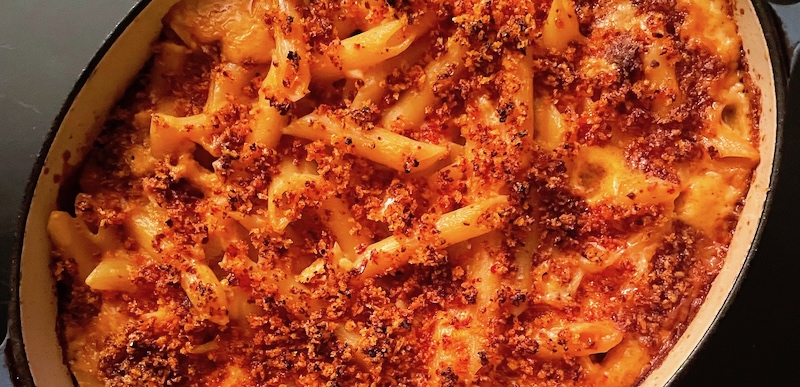
Over medium heat, melt butter in medium-sized saucepan. Remove from burner and add flour, stirring to combine. Place saucepan back on burner and cook on low heat for 1 minute, stirring constantly. Add garlic and stir briefly. Add milk gradually, stirring until it begins to thicken, then add cheese in handfuls, stirring after each addition until melted. Add cream cheese and stir until sauce is thick and creamy, then stir in gochujang. Add salt and pepper to taste. (The sauce should be slightly saltier than you'd normally make it, since when combined with the pasta it will tend to make it taste less salty.)
Add pasta to boiling water and cook until al dente. Drain and put back in pasta pot, add cheese sauce and stir gently to combine. Transfer to baking dish, sprinkling the topping mixture evenly over it. Bake in 350 degree oven 30 minutes.
If you have a CSA (Community Supported Agriculture) subscription to a local farm, you're probably getting weekly updates from your farmer about what crops will be available and what the season might look like going forward. A CSA is a great way for us city folk to have a connection to the land outside the paved boundaries of our lives, support a local small farm and to get a sense of the season from ground level. The bulletin below is from my CSA farmer, Aaron Nichols of Stoneboat Farm in Hillsboro, and this week he gave an excellent insight into this very unusual end-of-summer weather.
I hope you've all been enjoying the last weeks—they sure feel like fall out here. I don't remember the weather changing so seriously this early in August before, certainly not with enough rain that we don't have to irrigate for a week. It looks like we'll see it heat up (though not too much) over the next few weeks and our summer crops will certainly appreciate it.
This last week we were able to take advantage of the rain to get our biggest fall and winter salad plantings in—they take up a good amount of the space we'll be growing in over the winter and it's nice to see them all planted! We have a van-full left to plant next week but those will probably be in by the end of the month—having the longer-growing salad in by the end of August is a goal most years but not one we normally meet! We also planted our last round of kales, broccoli, and cabbage.
The greenhouse is looking pretty empty of growing things now, though it's currently drying down the shallots—they're nearly done which is good because a whole lot of onions need to get in soon! We managed to get some potatoes in the ground while the soil was mostly dry mid-week, and before it started to rain again today. The rain is pretty nice for the newly seeded and newly planted crops we have out there—they all look good. It's also got us a new flush of weeds!
The cool weather and the rain did cause a few problems, most notably for the corn. Our careful corn planning is now way out of whack with the last corn looking healthy, but still far from being ready, and the current corn is falling over from the wet soils and winds over the weekend making for worse pollination and fewer ears. It will be back but isn't loving the mid-60 degree days! Our tomatoes weathered the storm better than the corn but did have pretty slow production as did most of their relatives—eggplants, peppers, etc.—but they'll all be happy next week with the warmer weather.
The fall things look good though: broccoli as early as next CSA and cabbages will probably be in at just about the same time; kale and cauliflower are not far behind that. We have carrots now and likely next week. Before October I think we'll have some leeks in the CSA and we'll certainly have more kinds of winter squash sneaking in there. Next week's CSA should feature some fun potatoes—all purples and fingerlings.
Back in my college days in the 1970s, bran muffins were lumped into the category of "hippie food" along with granola, hummus, brown rice and pretty much all whole foods.
Stewed prunes from Joy of Cooking, 1955 edition.
In my grandmother's time, bran and other foods, like prunes, were used as "digestive aids," a euphemism for their laxative properties. I remember my grandmother, a ranch wife in Eastern Oregon, putting up a dozen jars of stewed prunes every winter, the little black fruits doled out in moderation lest they prove too effective at their task.
I, of course, would sneak them out of their hiding place in her fridge whenever I thought she wasn't looking, enjoying their savory sweetness and even sipping the syrup they were preserved in—with no discernible ill effect as far as my grade-school self could tell.
(I was kind of a weird kid, foodwise, preferring having a slice of pie to a frosting-slathered cake, chewing on raw rhubarb to sucking on candy and generally favoring savory to sweet. But I digress.)
Because "it'll help you poop" isn't all that appetizing.
After my grandmother's day, bran's laxative superpower slid easily into the "health food" arena, synchronizing nicely with the booming weight loss industry of the 1950s and 60s. One television commercial from the era advised that if you consumed bran cereal it would promote "youthful regularity," and an article on the contemporary history of bran stated that "multiple diets emerged on the scene promoting bran as either the foundation of a healthy nutrition plan, or the secret weapon for preserving a rapid weight-loss strategy."
Here at home these days, bran is a fortuitous byproduct of Dave's home-milling, a result of grinding whole wheat for his sourdough bread and then sifting it to remove some (but not all) of the bran to get the result he wants. The recipe below probably uses bran from the same sifting process—the Washington State University (WSU) Breadlab, a group of WSU researchers, are dedicated to developing better tasting, healthier, affordable grains to support small-scale organic farmers while not pricing people out of staple foods. (Read more about The Breadlab's origins.)
As for the dead-simple recipe below, apples of all stripes are available this time of year, so find a nice tart variety—we are currently in love with Ashmead's Kernel from Kiyokawa Family Orchards in Parkdale and Liberty apples from Queener Farm—and make your own applesauce, or simply core and dice one up, sauté it in a knob of butter until it's slightly tender, then mix into your muffin batter.
Applesauce Bran Muffins
From the WSU Breadlab: These apple sauce bran muffins are made with 100% unsifted Climate Blend, with a ton of extra bran added. We say it every few months, but we do not understand bran muffins that call for white flour. Our lab, along with soil scientists, plant breeders, food scientists and medical professionals, is participating in a USDA-funded Soil to Society grant to create more nutritious, affordable and accessible whole grain-based foods. From the soil to your table, we think a muffin is a good start.
1 1/2 c. any whole wheat flour 2 c. bran and germ (if you sift use that) or a good all-bran cereal 3/4 c. tart apple sauce [or sauté 1 medium-sized chopped apple in 1 Tbsp. butter until tender] Scant 1/2 c. sugar 1/2 tsp. salt 1 1/2 tsp. baking powder 1 1/2 c. milk 1 egg 1/4 c. oil
Soak bran in milk for a few minutes. Add all other ingredients. Mix by hand. Adjust moisture as needed. [We didn't need to add any more milk.] Line a muffin tin with parchment baking cups and fill with batter. Bake for 20 minutes at 400°. If needed, you can broil for last 30 seconds or so to brown the tops. [We've never needed to broil them.]
Some seasonal treats are worth waiting all year to make. Think of a tart rhubarb crisp or maybe a berry jam from the first berries of summer when the pectins are at their peak. Or nocino, a walnut liqueur made from green walnuts in the embryonic stage before they form a hard outer shell.
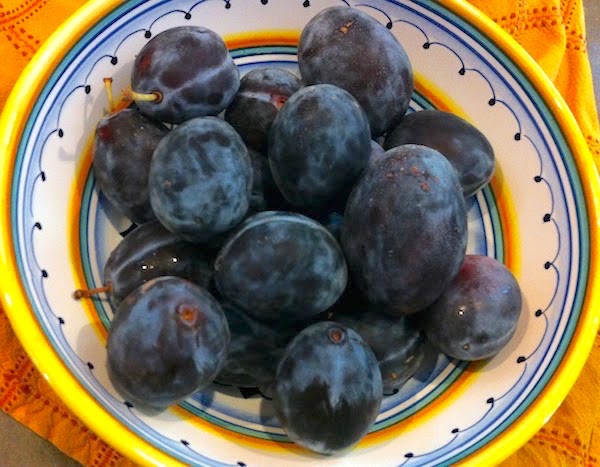
Italian prunes.
While plums are delightful, their cousins the Italian prunes are some of my personal favorites for preserves or desserts, and this time of year I'm bound to literally run across them on the sidewalks of my neighborhood.
A fascinating piece of local history I came across is that Oregon owes the introduction of the Italian prune to one Dr. Orlando Pleasant Shields Plummer (below right).* Other sources credit nurseryman Henderson Luelling with the introduction of the Italian prune to the state around the same time.
Dr. Orlando P. S. Plummer.
Plummer was a medical doctor, professor and the first dean of the medical school at Willamette University, in addition to being a telegraph operator and a fruit farmer. He was also elected to both the Portland City Council (1865-66) and the Oregon Legislative Assembly (in 1880 and 1882).
An avid horticulturist, he owned a 20-acre fruit farm in Southwest Portland, planting his first prune trees, a variety called Fellenberg, in the late 1850s. By 1927 the variety had grown in popularity to the point where there were 55,000 acres of Italian prunes growing on farms in Oregon and Clark County, Washington.
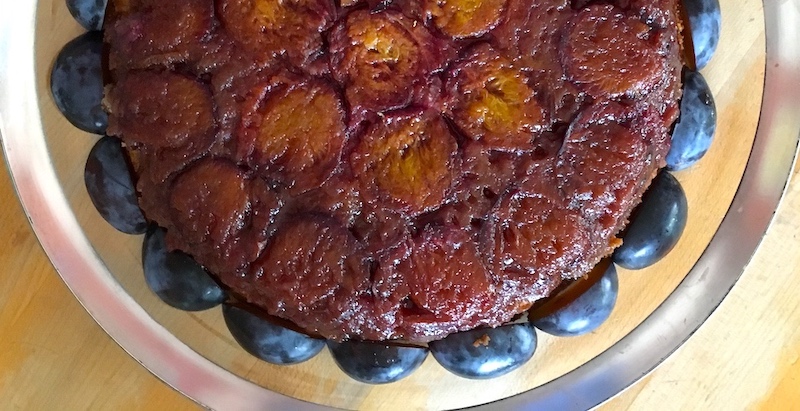
Obviously some were also planted in parking strips in my neighborhood, and their fruit makes a mighty fine cake.
Plum Upside-down Cake
For baking pan/dish: 3/4 c.butter, softened, divided 1/2 c. packed brown sugar (for buttered pan)
For cake: 2 c. fresh prunes or plums, pitted and halved 3/4 c. sugar 1 lg. egg, room temperature 1 tsp. vanilla extract 1 1/4 c. all-purpose flour 1 1/4 tsp. baking powder 1/4 tsp. salt 1/2 c. milk
Preheat oven to 350°.
Melt 1/4 cup butter; pour into an ungreased 9-in. round baking pan. Sprinkle with brown sugar. Arrange plum halves in single layer over sugar.
In a large bowl, cream sugar and remaining butter until light and fluffy, 5-7 minutes. Beat in egg and vanilla. Combine the flour, baking powder and salt; add to creamed mixture alternately with milk, beating well after each addition. Spoon over plums.
Bake until a toothpick inserted in the center comes out clean, 45-50 minutes. Cool for 10 minutes before inverting onto a serving plate. Serve warm.
* From Corning, Howard M. (1989) "Dictionary of Oregon History," Binfords & Mort Publishing, p. 199.
Fall is a contradictory season in the Pacific Northwest. We mourn the loss of long evenings on the patio with friends, but welcome the cooling temperatures at night—what my family calls "good sleeping weather." The breezy clothes and sandals get stashed back in the closet, but that means it's time to dig out our favorite sweaters and jeans from the storage bins under the bed.
Bean stew with chimichurri.
We'll miss grilling steaks and big pans of paella over the fire, but the braising pot is singing its siren song of long-simmered pot roasts and spare ribs. Pea shoots and summer squash give way to corn and seafood chowders and hearty bean stews. And I can't forget the panoply of chicories that local farms are growing, from dark red radicchio and treviso to castelfranco with its paler-than-pale yellow leaves slashed with splashes of pink.
Josh Alsberg of Rubinette Produce put it bluntly. "Anything summer is over," he said without a trace of wistfulness. That's because it's high season for fruit from his favorite Northwest growers, from grapes to figs to pears, adding "we're headlong into apples."
Josh Alsberg, Rubinette Produce.
Word of his produce passion is apparently getting around, since he has been recognized by the International Fresh Produce Association for his work with local schools, choosing six out-of-the-ordinary varieties for a blind taste test with students. He demonstrated how to score the apples based on attributes like taste, crunch, density, and other factors. Then teachers turned the activity into math and health teaching opportunities.
As far as what you'll be finding at our local farmers' markets in addition to the apples, pears and figs mentioned above, Alsberg said it's time for winter squash to start rolling in. If you're looking for inspiration that'll take you beyond butternut's stranglehold, check for some terrific recipes from the Culinary Breeding Network's Eat Winter Vegetables team. When buying winter squash, Alsberg cautions to be on the lookout for soft spots and try to buy squash with the stem intact, since the absence of a stem is an invitation for mold to set in around the ring.
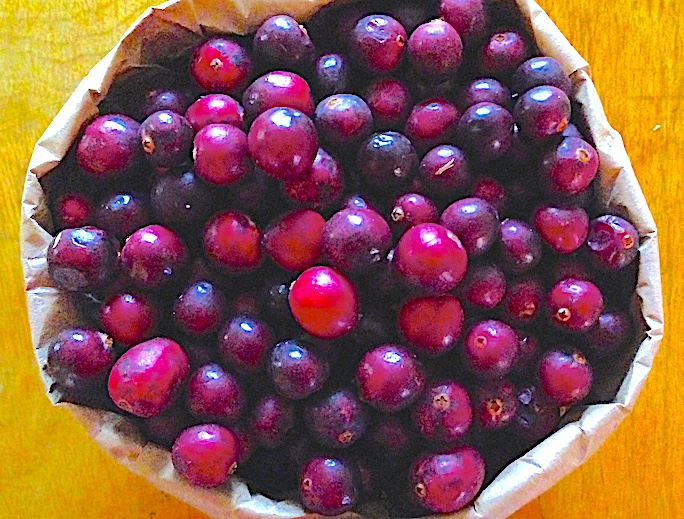
Local cranberries? Grab 'em!
It may seem early but if you find local cranberries, buy them now rather than waiting. They freeze well and will be a their best for your holiday feasting. Why is it such a challenging year? Consolidation in the industry—hello Ocean Spray and giant Wisconsin producers—has driven prices down to the point where Oregon's once-thriving cranberry farms can't compete, and many are giving up their bogs entirely and getting out of the business.
The smell of peppers roasting will be wafting through the aisles at farmers' markets, with peppers ripening a bit later than usual this year due to our cool early summer temperatures. Alsberg is particularly excited about the new "Habanada" variety, described as the first truly heatless habanero, hence the haba-nada, get it? He added that it's a good year for the beloved Jimmy Nardello peppers, which seem to be sweeter this year.
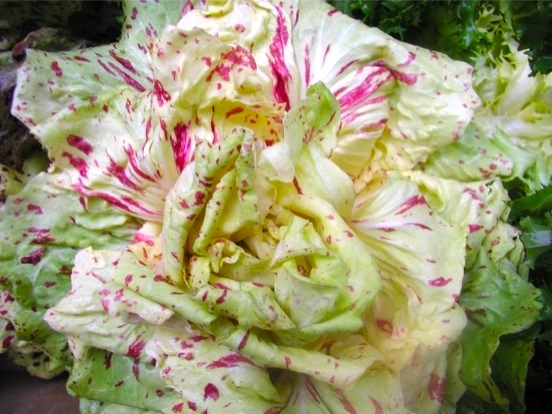
Castelfranco chicory.
You'll find an early onset of chicories, which local farmers are adapting to debut in the fall rather than their usual appearance later in winter. Lettuces will still be available at least until the first frost, with watercress, spigarello and puntarelle on the way.
The roots are coming on strong as well, with hakurei salad turnips, radishes, rutabaga, sunchokes, carrots and zingy local celery that Alsberg refers to as "the adult version of celery." It's expected to be banner year for foraged mushrooms, with prices on the intoxicating golden chanterelles already getting into affordable territory, along with local porcini, matsutake and even truffles if we get an early freeze. Another caution: Alsberg advises buying foraged mushrooms from a reputable dealer since some porcinis have been found to be wormy—ask the vendor to cut into them if you have doubts.
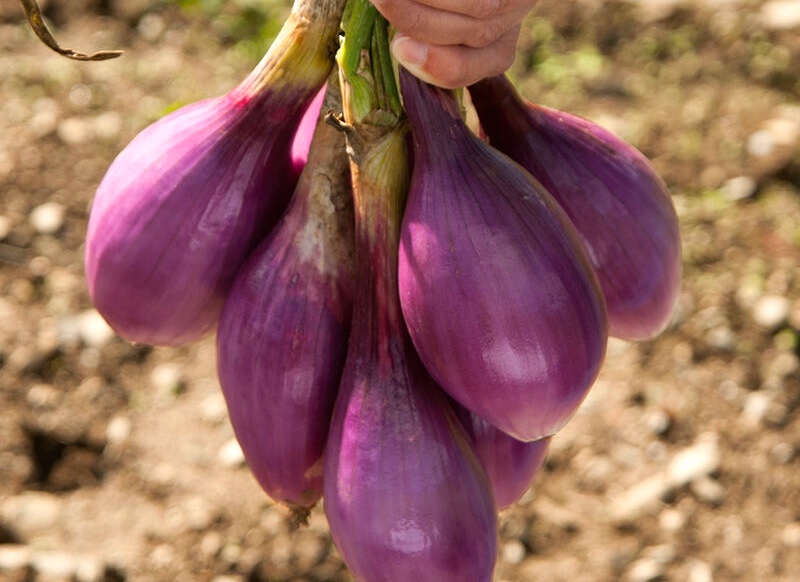
Tropea onions.
It is, of course, brassica season, time for brussels sprouts, romanesco, cauliflower in a rainbow of colors, its cousin fioretto, a sprouting cauliflower, and sprouting broccoli. Alsberg says local garlic in many new varieties is being grown and is worth taste testing to find your favorite, and you can now find locally grown ginger appearing on vendors' tables, a treasure for lovers of ethnic cooking.
Alliums abound for onion-lovers, with the mild, elongated tropea onion the fresh face in town that's turning heads on restaurant menus and foodie tables alike. Potatoes and different varieties of fingerlings are de rigeur this time of the year, as are leeks, fennel and "anything bulby" according to Alsberg, who's fond of a new-ish variety of beet called Badger Flame, a gorgeous flame-red, cylindrical beauty with concentric rings (similar to Chioggia beets) whose colors deepen as the season progresses.
All in all, a good season to get thee to your local farmers' market!
As cabbage season is upon us once again, I thought it was high time to rerun this post from December, 2011. The basic technique described below is the one I still use, though I don't do the water bath canning method that Ron prefers, since I like the crunchy, fresh (and probiotic) quality of the cabbage straight from the crock—the only drawback is you need more fridge space to store it, since it's not shelf stable. C'est la vie!
If it wasn't for a teensy misunderstanding, I might have been enjoying sauerkraut long before I did. You see, my mother had been told that my father's father had come to the United States from Germany as a young man.* So, as a young wife wanting to please her new husband, she tried serving him meals that would appeal to what she thought of as his German-American upbringing.
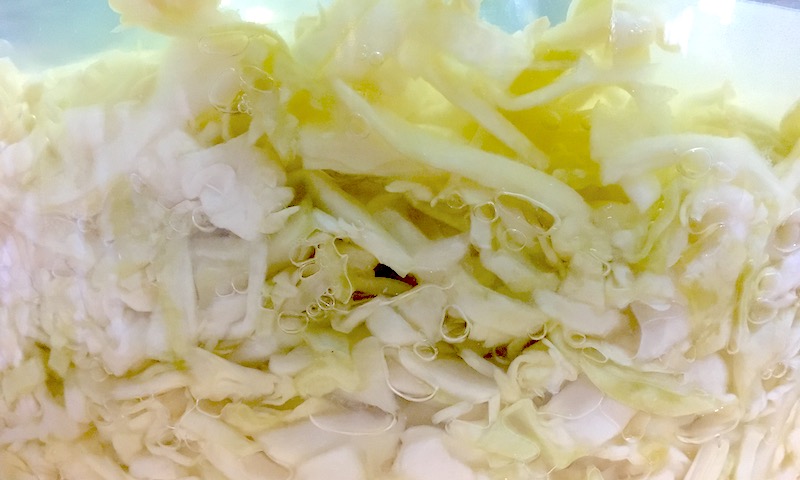
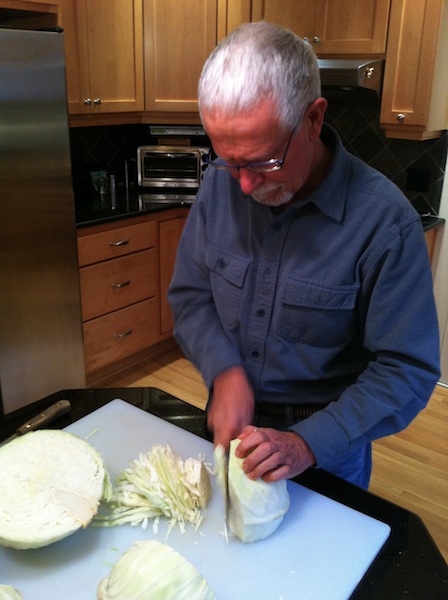
Slicing the cabbage.
Occasionally we would come to the family dinner table to find her version of a German dish was being featured, that is, sauerkraut straight from the jar heated on the stove with hot dogs—Oscar Meyer, no doubt—simmered in it. I think it took my father years to tell her he really wasn't fond of sauerkraut, but not before the tart, vinegary, tingle-your-back-teeth feeling was etched into all our minds.
That all changed for me when Dave and I went to France, traveling through the region called Alsace. Staying in an auberge with a fantastic restaurant on the first floor, we had the regional specialty called choucroute garnie, sauerkraut simmered for hours in a rich stock with sausages, pork, ham and other meats. It was truly a revelation, and forever changed the way I think about sauerkraut.
Packing the crock.
Which is why, when the subject of sauerkraut came up at a dinner we attended recently, I effused about my love for fermented cabbage. It turned out that the fellow I was speaking to was a sauerkraut aficionado, making gallons of the stuff every year from local cabbage, and he asked if I'd like to come observe the process. As you might expect, he'd barely finished asking when I answered, "Hell, yes."
I showed up one morning to find Ron Brey in his kitchen with several gigantic heads of green cabbage sitting on the counter. He buys them from Sun Gold Farm at the PSU farmers' market and looks for large cabbages—he buys 14 pounds total, or about three, per batch—that are tight and "hard as rocks." That amount is good for about seven quarts of sauerkraut, exactly the number of jars that will fit in his canner. He then slices the heads into quarters and then cuts those in slices about the thickness of a dime, slicing around the core.
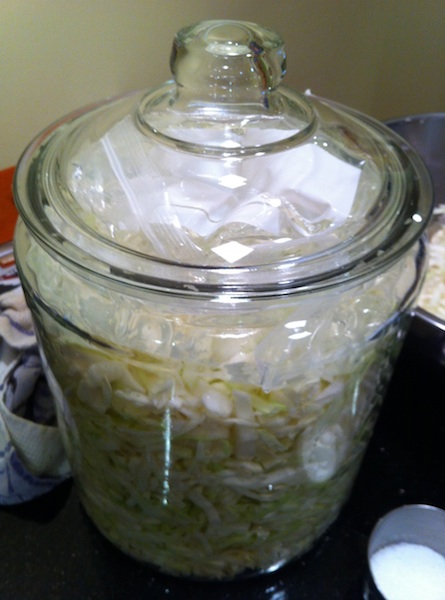
Ready to ferment!
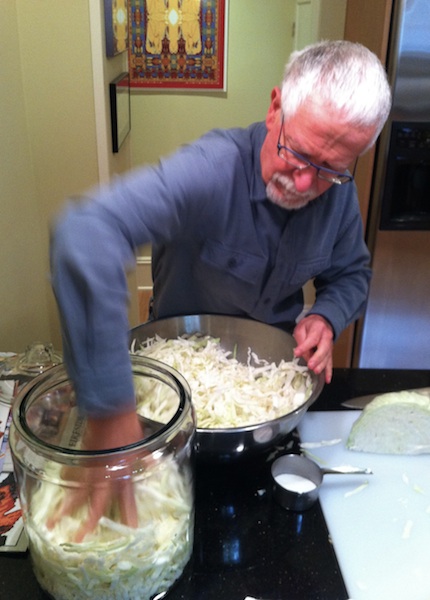
The chiffonade from the cabbage goes into a bowl and is mixed with 11 tablespoons of salt, which almost immediately starts to "sweat" the cabbage, that is, to pull the moisture out of the leaves. Ron says he uses kosher salt because it has no additives, and mixes it in gradually as he adds more cabbage. The salt and cabbage mixture is then left to sit in the mixing bowl for six hours.
After that, Ron transfers the shreds of cabbage into the glass crocks he uses to ferment the sauerkraut. (The glass-lidded glass jars are from Fred Meyer and he says they're much cheaper than most of the ceramic crocks sold for making sauerkraut.) He firmly packs the sauerkraut in the crock by hand until it's about seven-eighths full, or up to the shoulder of the crock. [It's not necessary to completely fill the crock. I've done batches with as little as 1/3 of the crock and it turned out great.]
Packing the kraut into jars.
Brey emphasizes that it's important that the sauerkraut remains submerged in its liquid in the crock, and various mechanisms have been developed to press down the shreds, some of which work better than others. But here's the genius part: Ron came up with his own method that works like a charm and is so simple it's ridiculous. He takes a gallon zip-lock bag, fills it with water, and sets it in the crock on top of the cabbage. With a gallon of water weighing in at about eight pounds, it's plenty to keep that crazy sauerkraut under control, and it conforms to the shape of the crock. Awesome!
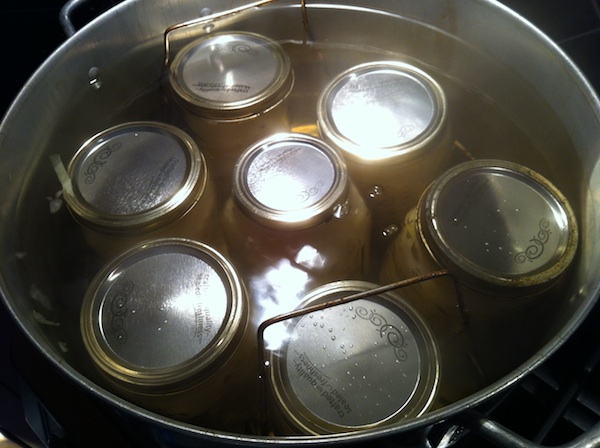
The hot water bath.
The cover is placed on the crock, and the sauerkraut goes down in Ron's basement to ferment for a couple of weeks. He likes to keep it at 65° for the fermentation…lower than that would be fine, but would slow down the process. He says, "There is some point—certainly by 80 degrees—where it becomes increasingly likely that the kraut will not ferment correctly. It can become soft, dark and lose the combination of tartness and sweetness." The kraut should remain fairly light-colored during fermentation; any serious darkening is an indication the ferment has gone wrong and should be tossed. Ditto, obviously, with mold.
After a couple of weeks the crock is brought up to the kitchen, the kraut is transferred to clean quart glass canning jars and is canned in the same kind of water bath canner my mom used for preserving fruit. Too bad she never knew about homemade sauerkraut and that paradigm-shifting choucroute.
Ron recommends the book "Stocking Up" by Carol Hupping as a basic guide for making sauerkraut and other preserved foods. I would also recommend "The Art of Fermentation" by Sandor Katz as an excellent guide. For Japanese pickling methods, the slim but essential "Tsukemono" is unsurpassed.
* In going through some family papers, I have since found out that my grandfather was born on Oct. 2, 1891, in the town of Sitauersdorf/Sitauerowka in the region of Galicia in what was then Austria, and is now a geographic region spanning southeastern Poland and western Ukraine.
The combination of dogs and a walkable neighborhood gives me the perfect excuse to go on reconnaissance missions around my neighborhood, looking—some might call it snooping—on parking strips and in front yards for fruit trees. Having older dogs that, like toddlers, are more interested in process than destination, I've taken the opportunity to note the plum, Italian prune, fig, pear, apple, cherry and persimmon trees on our various routes.
Before…
Some are gnarly old things that predate the bungalows built in the 1920s, the only surviving remnants of the orchards and farms that used to dot the countryside between the small towns like Sellwood, Albina, Multnomah, Kenton, Lents and St. Johns that were eventually annexed by Portland. Others were planted as street trees in the intervening years, though I wonder if the hapless homeowner who planted the giant walnut tree in his front yard thought about the terminal velocity of ripe walnuts when they drop 60 feet onto his car (or his head).
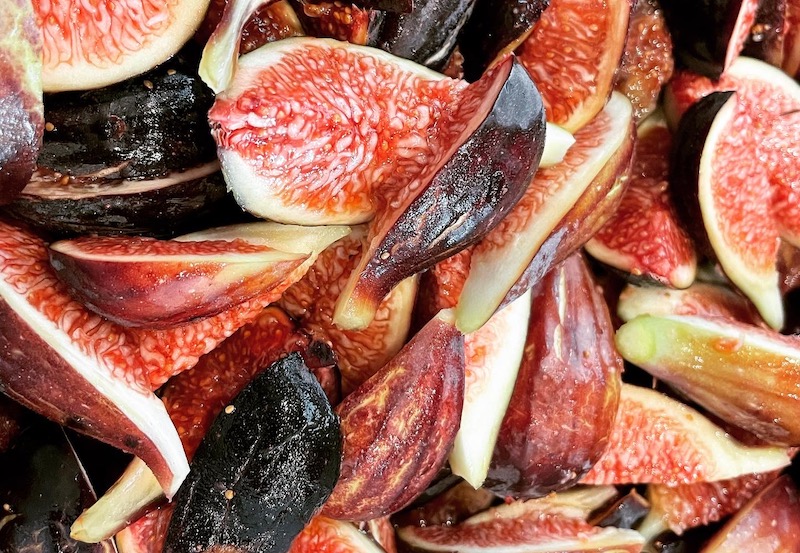
In any case, just around the corner from us is a fig tree that was planted around a dozen years ago that the homeowners had tried to espalier along a short retaining wall. The scent of the leaves was intoxicating on warm summer nights, but it never bore fruit until the house sold and the new owners neglected to trim it back. The next year there were big, dark brown figs dangling from its branches and I began stalking the house, hoping to strike up a friendly, if self-serving, conversation with the new owners.
…and after!
A few weeks ago I finally—aha!—caught the sister of the owner carrying groceries into the house and casually asked if perchance they ever used the figs or would…ahem…mind sharing some of them. She said she was hoping to dry some, but there were way more than she could use, so I could help myself.
Score one for persistence!
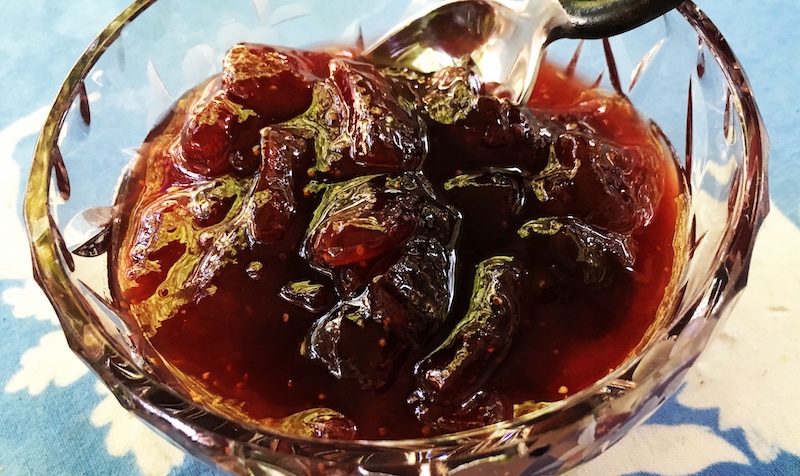
So yesterday, shopping bag in hand, I walked over and plucked five or so pounds. They were delicious for eating out of hand, and I made the rest into a stellar jam using a recipe from Martha Rose Shulman as a guide, though I doubled her recipe and used a bit less sugar than she called for.
2 1/2 lbs. ripe figs, roughly chopped 4 1/2 c. sugar 5 Tbsp. fresh-squeezed lemon juice, strained 4 tsp. balsamic vinegar (or more to taste)
In a large bowl, toss together chopped figs and half the sugar. Cover bowl with plastic wrap and refrigerate for 1 hour.
Transfer figs and sugar to a medium-sized saucepan. Bring the mixture to a boil, stirring frequently to prevent scorching. When mixture comes to a boil, scrape back into bowl and cover with plastic. Let cool and refrigerate overnight.
Scrape fig mixture back into the saucepan. Place a small plate in the freezer to use for checking the thickness of the jam as it cooks. Bring the fruit back to a boil over medium heat, stirring frequently. When the mixture comes to a boil, stir in the remaining sugar, the lemon juice and the balsamic vinegar. Boil, stirring, until mixture is thick but not too concentrated, 10 to 15 minutes. Skim off any foam that accumulates. I also skimmed off some of the seeds that cluster at the surface, though it's not necessary to skim off all of them. (Dipping the back of a soup spoon into the seeds works like magic!)
To test for doneness, remove the plate from the freezer and place a spoonful of the jam on it. Wait about 20 seconds and tilt the plate. The jam should only run slightly, and fairly slowly. Boil a little longer if it seems too runny, but take care not to cook it until too thick. It needs to be spreadable.
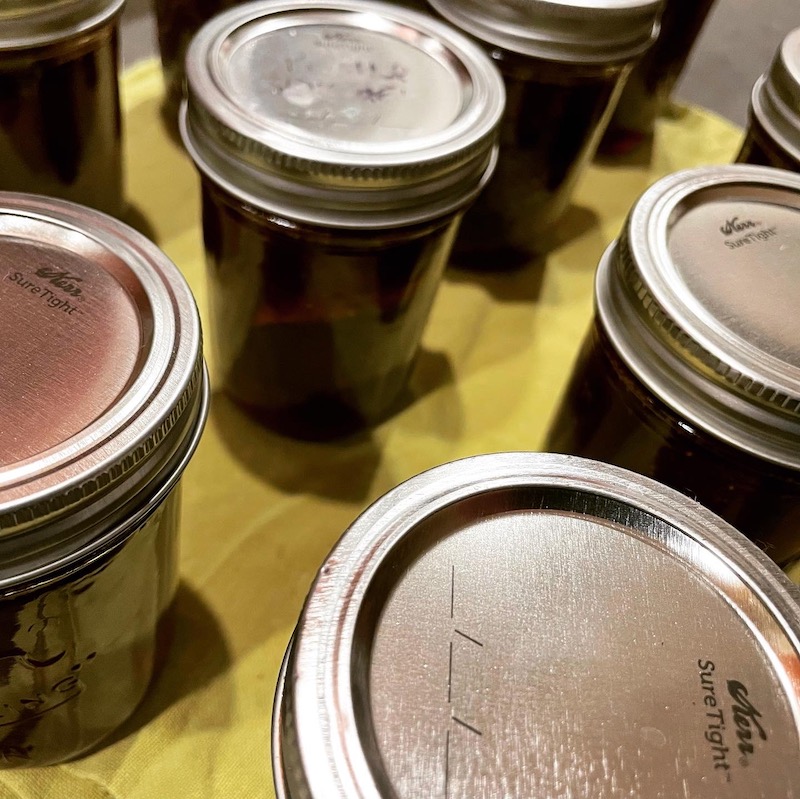
Transfer the jam to clean jars, wipe the rims and place canning lids on top. Place canning bands over the lids but don't tighten bands more than finger tight. Allow to cool, tighten the bands, then refrigerate or freeze.
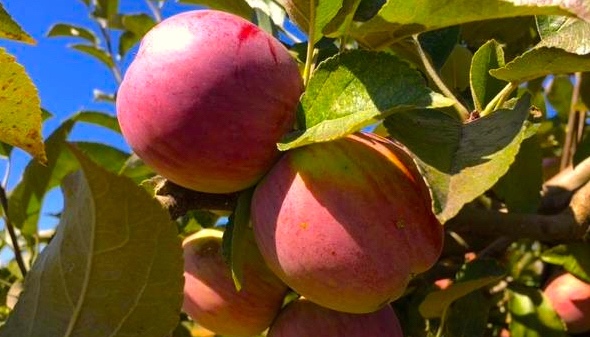
I sat down recently with Josh Alsberg of Rubinette Produce to get the skinny on what's coming in from local fields this fall and he just shook his head. "Everything is two to three weeks late," he said, with farmers finding late summer crops like nectarines and peppers ready for harvest at the same time as apples and winter squash. (See below for Rubinette's fall apple tasting event.)
Colorful chicories are everywhere.
The weeks of cool temperatures this spring practically ruined some crops like plums and severely limited others. Northwest cherry growers experienced the first-ever snowstorm in mid-April, right in the middle of bloom, resulting in the region's smallest harvest in 14 years.
Other crops, however, have been loving the long, sunny, not-too-hot temperatures we've had this summer, and farmers' market stalls should be bursting with greens like kale, chard, rapini, mizuna, mustards, spinach, arugula and spigarello. Look for the brassicas to come charging in, too, with brussels sprouts and cabbages aplenty, along with roots like celeriac, beets, kohlrabi, turnips and garlic. Sweet local carrots will benefit from cooler temperatures to come, and you'll start to see brilliantly colored watermelon radishes and blushing shades of daikon making an appearance.
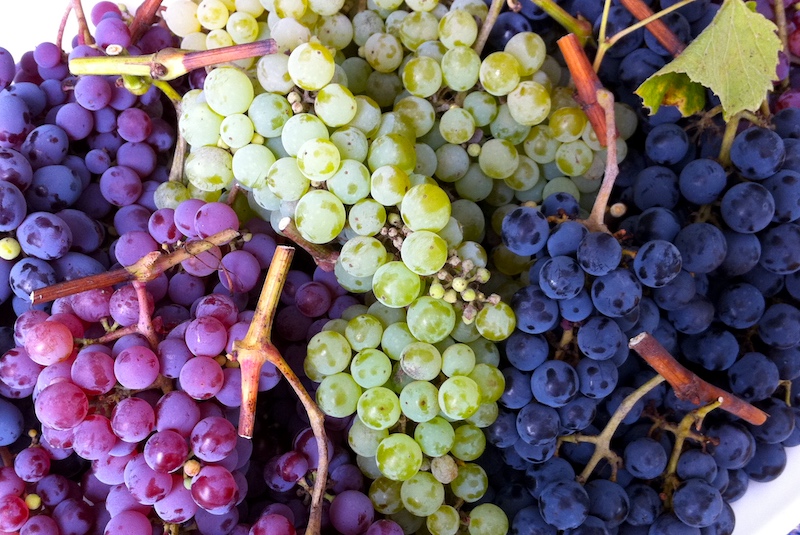
Fall calls for table grapes.
Late fall salads will benefit from one of my absolute favorites, the chicories—think radicchio but in all the colors of the rainbow from deep red chioggias to the palest yellows and pinks, and others speckled and striped, in shapes from fluffy heads to spear-shaped—all benefitting from a creamy vinaigrette or Caesar-type dressing, especially when you throw in a shower of crushed local hazelnuts.
Josh cautions that winter squash yields could be tight this season. "If there's something you like, get it now," he warns, especially if it's an heirloom like Koginut or Futsu. Others to look for include red kuri, baby blue Hubbard and kabocha, plus standbys like delicata, butternut and acorn. (You'll find a plethora of recipe ideas at EatWinterVegetables.com)
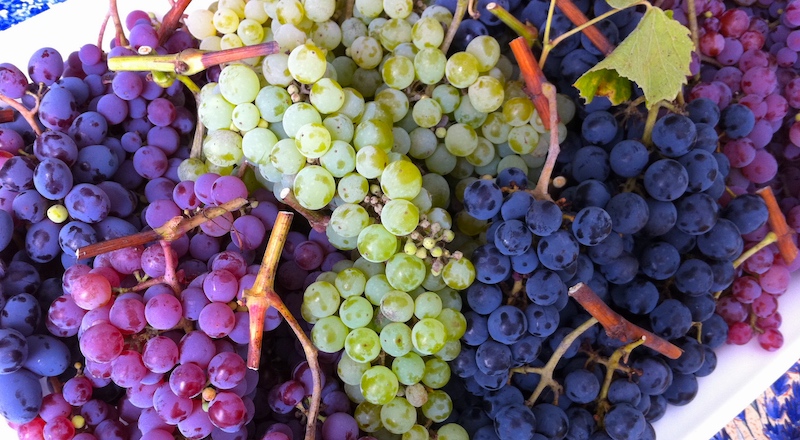
In terms of what's coming in the next few weeks, look forward to persimmons, quince, grapes, and Asian pears. And, of course, apples. Which brings us to the Providore Apple Fest coming up this weekend!
Providore Apple Fest
Sat.-Sun., Oct. 22-23, 11 am-3 pm Providore Fine Foods, 2340 NE Sandy Blvd.
This weekend is your opportunity to taste and take home your favorite apples from among a hand-curated selection of 18 varieties, from Old World classics to brand new open-pollinated varieties—not a (TM) or GMO in sight—all grown by small orchardists in the Pacific Northwest. Plus you can sip and savor other fall flavors such as:
Apple pies and pastries from Little T Baker
Ciders from Son of Man & Dragonshead in the Providore wine room
Apple sausages from Revel Meats
Oysters with apple mignonette from TwoxSea
All the decorative gourds your heart desires from Hillary Horvath Flowers
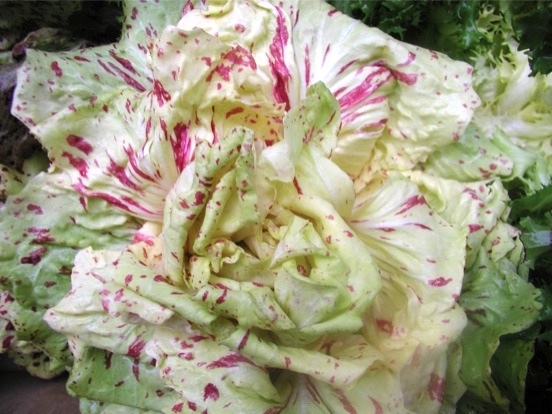
Verona. Castelfranco. Treviso. Chioggia. Lusia. Rosa del Veneto. A wide range of colors from deep burgundy to pastel pink to soft yellow, and solid to streaked to brightly speckled.
Radicchio season has been glorious this year, as evidenced by the gorgeous abundance of varieties at farm stands, farmers' markets and greengrocers. Not only has the weather been spectacular for this late fall crop, but more local farmers than ever are growing these slightly bitter members of the brassica family.
One reason it grows so well here is that, as Anthony Boutard has pointed out numerous times, we're at virtually the same latitude as Italy's Venezia and Piedmont regions, which means crops that grow well there will more likely than not will adapt well to our maritime climate. Luckily for us, Brian Campbell and Chrystine Goldberg, owners of Uprising Seeds in Bellingham, Washington, have caught the "bitter is better" bug and are working with several Northwest growers to develop and adapt these chicories to our climate. (To find out more, check out the Gusto Italiano Project, a collaboration between the Culinary Breeding Network, Uprising Seeds and the northern Italian vegetable breeders at Smarties.bio.)
So in late fall, my heart leaps when I see the first heads of Treviso and Castelfranco at the markets, and I can't seem to get enough of them in salads, chopped in wide ribbons and tossed with other greens and fall vegetables like black radish and fennel. I've also discovered an affinity between radicchio and our own hazelnuts—I've been crushing roasted hazelnuts and scattering them with abandon, where they bring a sweet counterpoint to the bitter notes of the chicory.
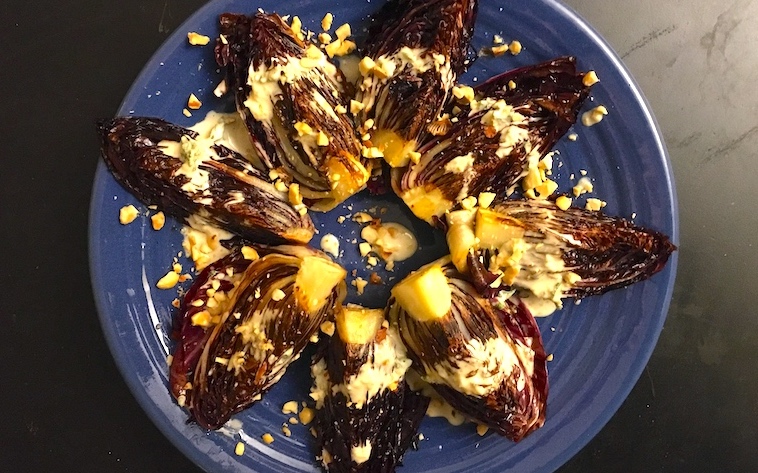
This year I've also discovered how delicious these fall beauties—particularly the tighter heads of Treviso, Chioggia and Verona—are when seared in a pan over a fire or on the stovetop. It takes just a few minutes to quarter them, sear them in a bit of hot olive oil and drizzle them with my creamy Miso Vinaigrette (below). And don't forget the roasted hazelnuts!
Seared Radicchio with Creamy Miso Vinaigrette
For the vinaigrette: 3 Tbsp. mayonnaise 1 Tbsp. Dijon mustard 2 Tbsp. rice vinegar 1 clove garlic, pressed in a garlic press 1 Tbsp. white miso Herbs, finely chopped (I like tarragon or thyme as well as chopped chives) 1 tsp. honey (optional)
For the radicchio: 2 Tbsp. olive oil 2 smaller heads of Chioggia, Verona or Treviso radicchio 1/2 c. roasted hazelnuts, crushed
To make the vinaigrette, combine the ingredients in a small mixing bowl and whisk together.
Slice the heads of radicchio in quarters, leaving the core intact so the leaves will stay together. (The cores will soften while searing and be quite lovely.) Heat the olive oil in a large frying pan and place the quartered wedges cut-side down and sear until very dark brown (don't worry if they look blackish…that's good). Turn and sear the other cut side, then turn onto the back and sear. Remove to a serving plate and drizzle with vinaigrette and sprinkle with crushed, roasted hazelnuts. Serve warm.

 So, to cut to the chase, an attempt at making gochujang mac'n'cheese had been on my mind for awhile. Sure, I've made various iterations of the classic cheesy noodle casserole from versions laced with
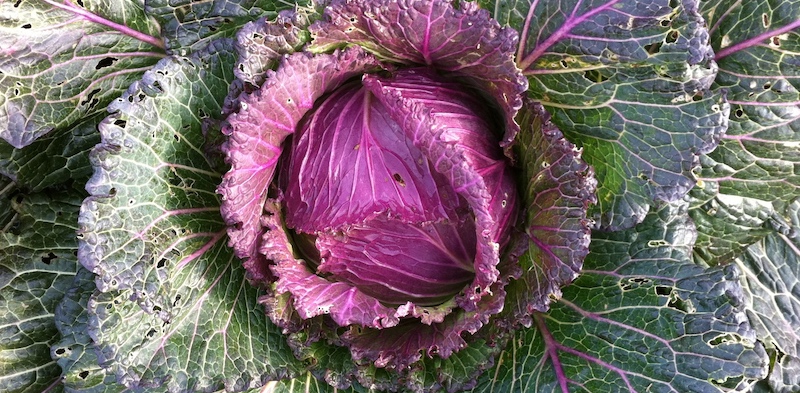
 The greenhouse is looking pretty empty of growing things now, though it's currently drying down the shallots—they're nearly done which is good because a whole lot of onions need to get in soon! We managed to get some potatoes in the ground while the soil was mostly dry mid-week, and before it started to rain again today. The rain is pretty nice for the newly seeded and newly planted crops we have out there—they all look good. It's also got us a new flush of weeds!
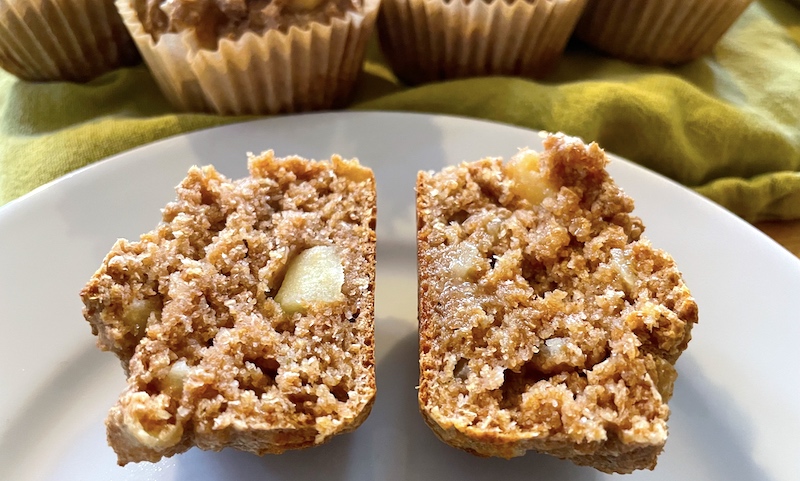


 Radicchio season has been glorious this year, as evidenced by the gorgeous abundance of varieties at farm stands, farmers' markets and greengrocers. Not only has the weather been spectacular for this late fall crop, but more local farmers than ever are growing these slightly bitter members of the brassica family.
 So in late fall, my heart leaps when I see the first heads of Treviso and Castelfranco at the markets, and I can't seem to get enough of them in salads, chopped in wide ribbons and tossed with other greens and fall vegetables like black radish and fennel. I've also discovered an affinity between radicchio and our own hazelnuts—I've been crushing roasted hazelnuts and scattering them with abandon, where they bring a sweet counterpoint to the bitter notes of the chicory.