This week's newsletter from the Beaverton Farmers Market is all about the colorful, luscious pears you'll see lovingly displayed in vendors' market booths, and I thought this one was so simple and uncomplicated that it deserved sharing here.
Decadent Pear
"Marketgoers love his apples, but they also love him for his amazing pears," wrote Market Master Ginger Rapport of Thompson Farms' Lynn Thompson. "Lynn is always welcoming and was happy to share his favorite pear recipe which he lovingly calls 'Decadent Pear.'"
4 sweet red pears 4 Tbsp. of brown sugar 4 Tbsp. of butter 4 strips of bacon, fried until crisp then crumbled
Halve the pears and hollow out the centers.
Spoon 1/2 tablespoon each of butter and brown sugar into each half, and microwave them for a minute to soften the pears.
Top with crumbled bacon and broil for a couple of minutes to crisp up the glaze.
I know, I know, calling a particular drink "the best cocktail" is hyperbole on the scale of saying one religion is the true path and everyone else is going to H-E-double toothpicks. And there are going to be comments like, "Whaddaya mean..." and "You're fulla..." But, doggone it, it's my favorite and I'm not afraid to say it.
Now, I've had lots of other great cocktails. After all, there is such a thing as due diligence in these matters and I'm all about fair play. Martinis, Manhattans, mojitos, lemon drops, G&Ts, sidecars, toddies...I could go on. But the Negroni is the one I always come back to as my touchstone, especially as made by my favorite bartender.
Serving over ice on hot summer days is allowed. (We won't tell!)
And it's not for everyone. You have to have a taste for the bitter (Campari) along with the sweet (vermouth). And the perfect accompaniment is a twist of lemon, though many practitioners are trying to substitute orange peel—in my opinion giving the drink a cloying oiliness rather than the zing that lemon rind contributes.
So if you're ready to try one, here's the recipe that we've adopted as our own.
Our House Negroni
A good friend of mine described the Negroni as "the perfectly balanced cocktail when made correctly." I've got to agree. The richness of the gin, the bitter-sweetness of the Campari, the balancing acidity of the vermouth. Measure it out if you have to, free pour if you're confident enough, just make it. This is a great old-school drink that originated in the 1930's, and is making a comeback today. Big ups for this very refreshing adult beverage.
1 part Gin 1 part Campari 1/2 part Sweet Vermouth 1/2 part Dry Vermouth
Fill your cocktail shaker halfway with ice, dump in the booze, shake then strain into a chilled martini glass and garnish with a twist of lemon.
A note on the gin: I love Beefeater and Taqueray, but with this drink I actually prefer the less assertive flavor of a Gordon's Dry Gin or a similar mid-range gin. Also, if you look in a vintage bar guide, it will invariably say one part sweet vermouth with no dry vermouth. But I was shown this half-and-half method by the bartender at Bix Restaurant in San Francisco many years ago—a great "must stop" bar for you martini fans—and this rounds out the flavors perfectly. Cheers!
I must have been around four years old. My family lived in a fifties-style ranch on a one block-long street of similar houses in Tigard, an early patch of development in what would become the suburban sprawl that quickly surrounded Portland in the 1960s and 70s.
At the back of the house, the edge of our neatly mowed, unfenced green lawn bordered on a field of wildflowers where I'd wander, picking bouquets to bring to my mother. It would eventually become a parking lot for a giant strip mall, but to my four-year-old self it was a vast prairie, a place for catching and studying the birds and bugs that lived there or spending what seemed like hours laying there and looking up at the clouds passing overhead.
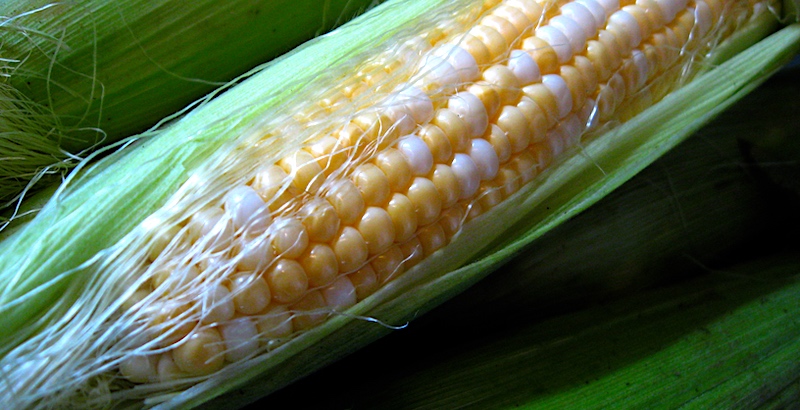
Across the street in front of our house was another row of houses identical to ours, beyond which stretched another field, this one planted with row upon row of corn. All the kids on our street would play hide-and-seek in that field, losing each other in the sameness of the shadowy stalks that stretched into the sky, their tassels glowing in the evening light. During the late summer I'd often wander off into the field on my own and pick an ear or two, peeling back the green husk and nibbling the sweet raw corn that always tasted better than anything boiled and buttered, and only emerge when I heard my mother calling from the front porch to come in for dinner.
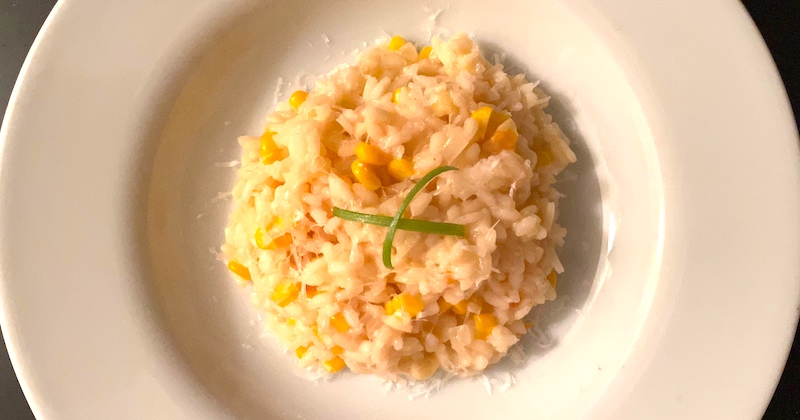
So when it's corn season and there's no field across the street to wander off into, I'll bring home an armload from the farmers' market, husk a few ears, scrape off the kernels and cook up a batch of corn stock from the cobs to make a corn risotto that brings back, if only for a few moments, that sweet memory from my childhood.
Sweet Corn Risotto
1 Tbsp. olive oil 1 Tbsp. butter or margarine 1/2 yellow onion, chopped fine 2 cloves garlic, minced 2 c. arborio rice 2 c. corn kernels 5 c. corn stock 1/2 c. parmesan Salt and pepper, to taste
To make corn stock, cut kernels off of five corn cobs. Put kernels in a bowl and set aside. Place cobs in large saucepan and cover with 5 cups water. Bring to a boil, then reduce heat to simmer for 15 to 20 minutes. Remove cobs and strain stock through wire mesh sieve to remove any debris.
Melt butter and oil in 2 1/2-3 qt. heavy-bottomed sauce pan. Add onion and garlic and sauté over medium heat till translucent. Add rice and stir for about 30 seconds till grains are hot and coated with butter mixture. Add corn and combine. Stirring frequently, add stock one ladle-full at a time, allowing rice to absorb it before adding more. When rice is tender but still slightly al dente, stir in cheese. Add salt and pepper, adjusting to taste.
My neighbors Bill and Jen have been a driving force behind many of my culinary explorations, with their extensive garden and Bill's consuming interest in fermentation. Jen, too, comes from a long line of picklers and preservers—check out her great-grandmother's refrigerator pickles recipe—and Bill turned me on to homemade shrubs like his cantaloupe and mint shrub.
Last year he gave me a bushel of purple shiso to play with, which led me to Andrea Nguyen's inspiring website, Viet World Kitchen, about all things Vietnamese—her Vietnamese Food Any Day cookbook has changed my cooking on a basic level—and her recipe for Vietnamese Shiso (Tia To) Shrub. I made several batches and we enjoyed them all summer long.
This year, just as the early July heat wave was hitting the Northwest with a vengeance, our Stoneboat Farm CSA was offering fennel as part of the share. Fennel's long wavy fronds are normally a source of annoyance since they've gone straight to the compost bin, but this time I asked my friend Melinda if there was a use for them. "Fennel fronds?!?" she exclaimed, her eyes lighting up at the thought. "Candied fennel! Syrup! Pesto!"
Okay, then—I now feel badly about dumping them all these years. But no more!
The pesto was made and enjoyed with a salmon fillet we grilled a couple of days later, and I made a syrup from the leftover stalks. It was good, but wasn't thrilling…until my son mentioned he'd made a soda with some of the syrup and had added a splash of tarragon vinegar to make it sing. And did it ever!
Don't get me wrong, I'm still in love with Andrea's shiso drinking vinegar, but this one may be the hit of this summer's beverage bar.
Fennel-Tarragon Drinking Vinegar
4 c. fennel fronds, sliced in 3" lengths 6 c. water 6 c. sugar 2 c. tarragon vinegar (see below)
In a large saucepan over medium heat, combine water, sugar and fennel fronds. Bring to a boil and turn off heat. Cover pan and allow to steep for 2-3 hours until syrup cools. Add vinegar and stir. Bottle and store in refrigerator (makes about two quarts); will keep for several weeks.
To make a beverage, fill an 8 oz. drinking glass with ice. Add 1 oz. drinking vinegar. Fill with club soda. Stir, adding more syrup or soda to taste. Garnish with lemon, mint, etc., if desired.
Tarragon Vinegar
Fresh tarragon White wine vinegar
Fill a couple of pint jars with tarragon sprigs—feel free to pack them in, but not too tightly; you need room for the vinegar, after all! Fill with vinegar to within 1/2" of rim. Place tight-fitting lid on the jar and store in a cool, dark place (like a basement) for 2 weeks. Using a fine mesh strainer, strain out the sprigs. Bottle (I save my empty vinegar bottles for just this purpose) and store in refrigerator.
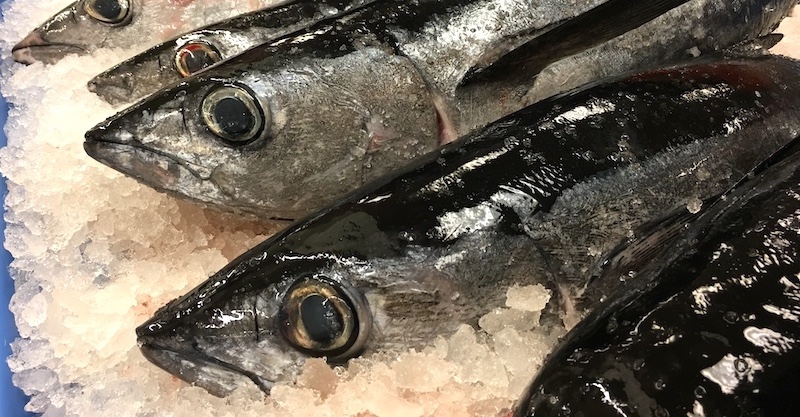
If you've been seeing ads from your grocery store or fishmonger offering whole fish for a fraction of the regular retail price but you're not sure how you'd use it, I'm reposting this handy guide.
There is nothing better, or better for you, than fresh-caught, wild, local fish. Fish are packed with Omega-3 fatty acids, high in protein and low in saturated fat, and the American Heart Association advises eating fish twice a week. Trouble is, the usual price per pound for fresh fillets in the butcher case puts it out of reach for most budgets. Plus many commercially available ocean species can be high in mercury, and farm-raised fish are usually fed high doses of antibiotics—think of them as factory farms for finned creatures—due to the crowded pens they're raised in. And don't get me started on the effects of these farms on our waterways.
Very few dinners impress guests as much as a whole grilled fillet.
But those of us on the West Coast are fortunate to have access to some of the most delicious wild fish on the planet in our populations of native wild albacore and salmon. This year the fleet of primarily family-owned boats have been pulling in a supply of albacore from the fishery that stretches from Northern California up into British Columbia. Certified as sustainable by the Marine Stewardship Council, these albacore are young—just three to five years old, low in mercury and weighing in at 12 to 25 pounds—and individually caught with a hook-and-line system. (Want more info? Read my post, Albacore A to Z, for details.)
Wild salmon, particularly from Alaskan waters, are in plentiful supply right now, too, with stores advertising tempting steaks, fillets and roasts. But if you want to get a real deal, look for special sales events featuring whole fish.
"Whole fish?" you say. "I don't even know where to start with a whole fish!"
Buy from reputable fishmongers who buy from local fishing boats.
Well, let's talk about where you buy it. Make sure the fishmonger is reputable—recent studies have found that almost 20% of fish sold to consumers are mislabeled, and fish ordered at restaurants are more likely to be incorrectly labeled than fish bought at markets or grocery stores. I recently bought two whole albacore and two whole Coho salmon at New Seasons Market, a regional chain that buys its whole fish from local boats and has several one or two-day sales events per season. Find more places to buy local seafood with the Oregon Seafood Locator Map and Listings.
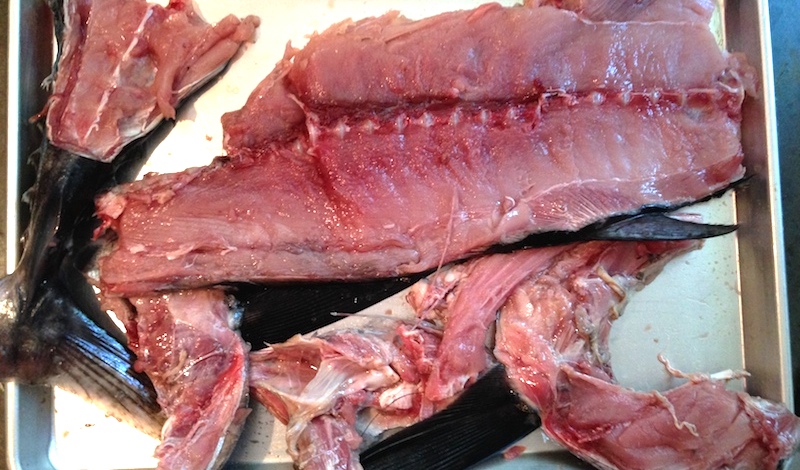
When you buy whole fish, you'll need to specify how you want it packaged. The fish are already cleaned, and most stores will butcher your fish at no charge, whether you want steaks or roasts or whole fillets. I always ask for the trimmings to be included, since the head, fins and bones make amazing stock for soups, chowders, risottos and paella, among many other uses. (Here's my technique for using those trimmings.)
Make sure the carcass is included—roast it, pick the meat and use the remainder for stock.
And don't believe those online charts meant for chefs that say the yield from a whole albacore, gutted and without the head, is 50 percent of the weight. From the 17-pound fish (head off) that I bought from the store, my yield was more than 80 percent after removing the loins, roasting the carcass (350° for 30 min.), picking off the meat (nearly 2 lbs.) and then making stock from the bones (2 1/2 qts.). The total weight of bones, fins and detritus that went into the compost bin was only two or three pounds. (Kind of tells you about the food waste that happens in restaurants, though, doesn't it?)
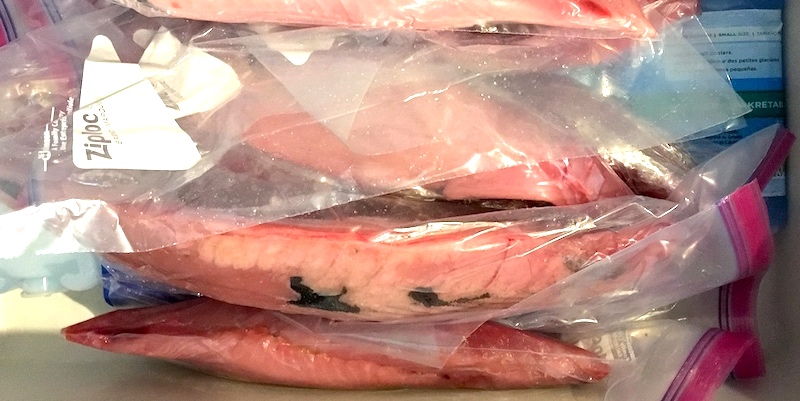
If you're not going to throw the fish on the grill right away—always a good idea, and just one good-sized fillet will feed four to six—you'll need to think about how you want to store it. With a vacuum sealer it's a done deal, since properly packaged fish will keep for as long as a year. The idea is to keep air away from the meat to prevent freezer burn, so if you don't have a vacuum sealer, what do you do?
Albacore loins come four per fish and are a cinch to seal and freeze.
I quizzed the fellow at the fish counter when I bought my salmon, and he said that his dad, an avid fisherman, would put a single fillet in a zip-lock bag and submerge it in a sink full of water, holding the closure just above the water line. The water pressure pushes the air out, making an airtight seal around the fish. Not having a sealing machine myself, a little smoothing of the wrinkles in the bag while it was submerged did almost as good a job as the machine. (I found that a two-gallon zip-lock bag will hold a good-sized fillet quite nicely.)
A note: it's good to go over your fish ahead of freezing to check for pinbones or other bones that the butchers may have missed. First, it makes it easier to just throw it on the grill without worrying about biting down on a bone while you're eating and, second, it keeps those pokey bones from puncturing the bag and letting air in. Just hold the fillet and feel for any bones by running your fingers down the flesh, then use a pair of (clean) needle nose pliers to pull out the bones.
All this is to say that you can have more fresh, local, sustainable fish in your diet without paying dearly for the privilege.
I don't know about you, but this is the way it goes at our house: I'm browsing through recipes online or reading an article about our local fisheries—it is, after all, part of my job—and I think, "Gosh darn it, we need to have more fish in our diet."
Then I close the window or finish the article and forget about it.
But this summer we've invested in a CSA subscription from Stoneboat Farm, which means I will be picking up our share every Saturday morning for 23 weeks at its booth at the Hollywood Farmers Market. And that just happens to be across the aisle from the beautiful display at Linda Brand Crab which, in addition to the eponymous crab in its name, usually has a plethora of other local, fresh-out-of-the-water fish and shellfish on offer.
Quick and easy roasted fish presents multiple delicious possibilities!
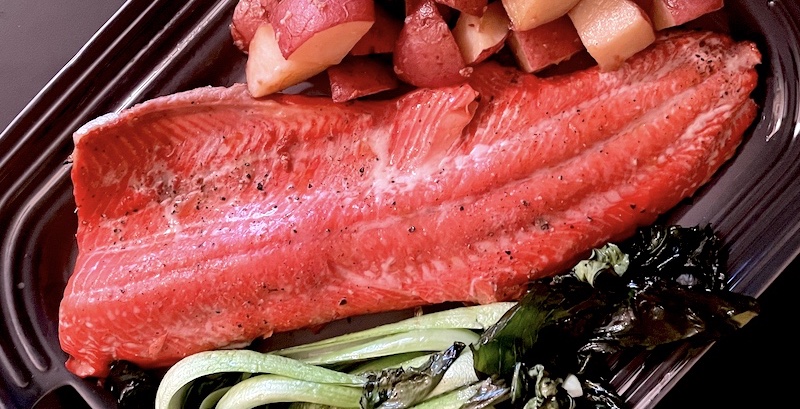
After I picked up our share this past weekend, I glanced across the aisle and noticed some beautiful rosy albacore tuna loins for a very reasonable price. So I picked up a small-ish, three-quarter pound piece and stashed it in the shopping bag with my vegetables, figuring I'd come up with something for dinner that night.
As usual the afternoon got involved, this time with a trip to the garden store for compost, digging it in to amend the dead soil in our raised beds,planting the tomatoes, peppers and ground cherries from Alice at Log House Plants, and suddenly the clock somehow said it was time to make dinner.
Oops. The albacore!
A quick scan of the veg bin—this is where a CSA really comes in handy—made the decision a snap, and with my homemade gochujang and other staples at the ready, I came up with a simple and, it turned out, incredibly delicious solution. Not just a terrific way to supplement a vegetable stir fry, this roasted fish would be great to use with any firm-fleshed fish as a main course with rice and salad, or sliced into cubes it would make a terrific appetizer right out of the oven (or off the grill) this summer.
Plus it makes it easy to fulfill that pledge to include more fish on our table!
Gochujang Roasted Albacore with Vegetable Fried Rice
For the marinade: 3/4 lb. albacore loin, sliced in 1" thick sections 3 garlic cloves, finely minced or pressed in a garlic press 2 Tbsp. gochujang 1 Tbsp. miso (I'm addicted to locally made Jorinji miso) 1 1/2 tsp. brown sugar 1 Tbsp. water to thin
For the fried rice: 4 c. leftover cooked rice* 4 c. vegetables, chopped in bite-sized pieces (I used cabbage, carrots and zucchini) 2 Tbsp. vegetable oil 1 onion, chopped in 1/4-inch dice 3 garlic cloves, minced 1 Tbsp. ginger, peeled and grated 2 Tbsp. gochujang 2 Tbsp. miso 1 Tbsp. fish sauce 1Tbsp. toasted sesame oil 1 bunch green onions, sliced into 1" lengths 1/2 tsp. red pepper flakes (optional) 1 Tbsp. toasted sesame seeds (optional)
Preheat oven to 400°.
Place a sheet of parchment paper in a roasting pan.
Chop vegetables for stir fry.
In a small mixing bowl, stir together the marinade ingredients. Thickly coat each piece of fish in the marinade mixture and place them on the parchment paper in the roasting pan. Reserve any remaining marinade for the fried rice.
Place roasting pan in oven, roasting for 10 minutes. Remove from oven and set aside while you cook the fried rice.
In a deep sauté pan, heat the oil over medium-high heat until it shimmers. Add the chopped onions and sauté until it starts to become translucent. Add the ginger and garlic to the onions and sauté briefly, then add the gochujang, miso and any remaining gochujang marinade and cook for 1 minute, stirring to keep it from sticking.
Add vegetables starting with the ones that take the longest to cook (like carrots, then zucchini and cabbage) and sauté until crisp-tender. Add pepper flakes, fish sauce, sesame oil and green onions and heat briefly, then add cooked rice.* Cook for at least 5-10 minutes to heat the rice, then season to taste with more fish sauce, miso or sesame oil if it seems bland.
Cut the roasted fish into 1" pieces and place on top of the fried rice. Serve, sprinkling with toasted sesame seeds if desired.
* It's not necessary to have cooked rice on hand—I've made rice just beforehand with no problem. If you need to cook rice, bring 4 c. water to a boil and then add 2 cups long grain or jasmine rice. When it returns to a boil, turn down the heat to low and cook until all the liquid has been absorbed, about 20 minutes. You can cool the rice at this point, or use it hot.
Points have been deducted from my lifetime hosting score because of my penchant for trying out new recipes on guests. Fortunately very few of them have been complete disasters, and with enough wine and a smashing dessert—the old saying about ending on a high note is worth hewing to—how could anyone complain?
The other night was a prime example. Dave had marinated a whole bone-in pork leg in a pernil-style rub, then smoked it for six hours, rendering it lusciously juicy and with an enviable red smoke ring just inside the crust. I'd gone to the farmers' market for spring lettuces for a salad dressed with my new favorite vinaigrette, and picked up asparagus because, well, duh, it's asparagus season and who can resist?
Arabian barley in the field.
Our guests for that evening were on a low-carb, low-salt regime so a "starch"—I've written before about the "meat, starch, vegetable" rubric that's imbedded in my middle-class, WASP-ish DNA—needed to be something other than the usual risotto or pasta or potatoes.
Fortunately I remembered there was a pound of barley I'd stashed in the freezer, so a grain salad seemed like a healthy solution. Parsley and mint were threatening to take over the garden, and darn it if that asparagus might come in handy, too.
Oh, and did I mention that Dave had made a raspberry sorbet for dessert? High note hit!
Barley, Asparagus and Mint Tabbouli
For the vinaigrette: 1/2 c. olive oil 6 Tbsp. lemon juice 1 Tbsp. Dijon mustard 1 clove garlic, crushed 1/2 tsp. dried oregano Salt and pepper to taste
For the salad: 2-3 c. cooked barley, either hulled or whole grain 1 c. coarsely chopped fresh mint leaves 1 c. coarsely chopped fresh Italian parsley 1/2 c. finely sliced spring onions, red onion, or sweet onion 1/2 to 1 lb. asparagus, cut into 1" long pieces and lightly steamed Salt to taste
If using unhulled barley, soak overnight prior to cooking.
Put 8 oz. uncooked barley in the bottom of a large saucepan and cover with 2-3" of water. Bring to a boil, reduce heat to simmer and cook, adding water if it gets too dry, until the barley is cooked through but still has a nice resistance when you bite into it…don't let it get mushy. (Unhulled barley will take longer than hulled barley.) Drain and rinse in cold water to cool. Transfer 2 to 3 cups, depending on how much grain you like in your tabbouli—I like less grain, more herbs—to a large mixing bowl, add remaining ingredients and enough dressing to moisten. Combine and, if time allows, let it sit for an hour or so for flavors to meld. Serve at room temperature.
While the barley cooks, make the vinaigrette. Take any tightly lidded pint container—I often use a jam jar—put all the ingredients into it, screw on the lid and shake like the dickens over the sink in case, as once happened, the lid didn't seal as tight as I thought and I ended up dressing the kitchen instead of the salad. It can be made ahead and stores well for several days in the fridge.
It's spring in the Northwest, which means we're getting two inches of rain in as many days thanks to an atmospheric river deciding to flow directly over the Willamette Valley, dumping its heavy load before climbing over the Cascades. The good news is that spring, being the Janus-like, capricious spirit that it is, will be whiplashing us with temperatures in the mid-70s to mid-80s within the week.
Until that happens, though, we still need to pull on our Muck boots and hooded parkas for another day or two and hit our local farmers' markets, many of which are fortunately opening for their regular seasons this weekend. I managed to make it to two of them, the Beaverton Farmers Market yesterday—a generous sponsor of the blog you're reading—and my intimate neighborhood King Farmers Market today.
Both were brimming with bounteous goods from growers and makers, and among other things I picked up several bunches of beautifully green asparagus to carry us through the week. Ready to go in the oven to roast, chopped into a quiche or frittata, or in a risotto like the one below, these green spears will be equally delicious grilled as is or chopped into a salad when those warm temps get here.
Spring Asparagus Risotto
1 lb. asparagus, tips removed and reserved, stalks sliced into half-inch pieces 2 Tbsp. extra virgin olive oil 3 Tbsp. butter or margarine 1/2 onion, finely diced 1 Tbsp. garlic, finely chopped Spring onion or green garlic, finely sliced (optional) 2 c. arborio rice 1 c. white wine 4 c. chicken or vegetable stock 1 c. grated Parmesan cheese plus more for the table Salt to taste
Put half of the chopped asparagus stalks in the food processor and purée (add a teaspoon or so of water, if needed, until smooth). Set aside.
Put stock in a medium saucepan over low heat. In a deep skillet or larger saucepan, heat oil and butter over medium heat. When it shimmers, add onion and garlic, stirring occasionally until it softens, 3 to 5 minutes.
Add rice and cook, stirring occasionally, until it is glossy, about 2 to 3 minutes. Add white wine, stir, and let liquid absorb into the rice. Add warmed stock, 1/2 cup or so at a time, stirring frequently. Each time stock has just about absorbed into the rice, add more.
When you have used about half the stock, add the puréed asparagus, asparagus tips, plus spring onions or green garlic (if using), stirring to combine, then continue to add stock as necessary. In 5 minutes or so, begin tasting rice. You want it to be tender but with a bit of crunch; it could take as long as 30 minutes total to reach this stage. Add the cup of parmesan and stir briskly, then remove from heat. Taste and adjust salt. (Risotto should be slightly soupy.) Serve immediately.
While one friend has dubbed the past few weeks "Nov-April" and is calling out the next few as "May-vember," farmers across the state are heralding the official start of spring. Farmers' markets in most communities are opening their regular season schedules this weekend, though in some places they will wait until June, so check your local market website for official dates and times.
Ginger Rapport, market master of the Beaverton Farmers Market, is over the moon in anticipation of spring's bounty. "By their very nature, the early vegetables are light, fresh, and delicate, and the dishes made with them reflect these qualities," she wrote in a recent newsletter.
Spanish calçots are a great excuse for a spring fling!
And I wholeheartedly agree with her pronouncement that the star of the spring show is asparagus. From slender varieties to more robust, meatier stalks, you'll find both green and purple asparagus in abundance at market booths. (Here Rapport reminds market-goers that purple asparagus, like purple pole beans, turns green when cooked.)
From risottos to salads to quiche to pizza, asparagus is almost infinitely versatile. Even simply roasted in the oven with a drizzle of olive oil and a shower of chopped garlic and salt—and sure, throw on some chopped preserved lemon just before serving—it threatens to outshine any main dish in the vicinity.
Alliums, particularly in their springy infancy, are also on display in the form of spring onions, scallions, green garlic and the fabulous Spanish calçots which have entire festivals in their honor in that country. See my recent post on how to throw your own Calçotada with the traditional red pepper-and-almond salbitxada sauce. And don't forget the curvy whips of garlic scapes, the thin, vibrant green stalks that grow from the garlic bulb and are terrific grilled and chopped for pizza, salads and, well, almost anything!
While local strawberries are only just beginning to appear in markets, and available only to those early birds who grab them before vendors sell out, there are plenty of other stellar finds to make your trip to the farmers market worthwhile.
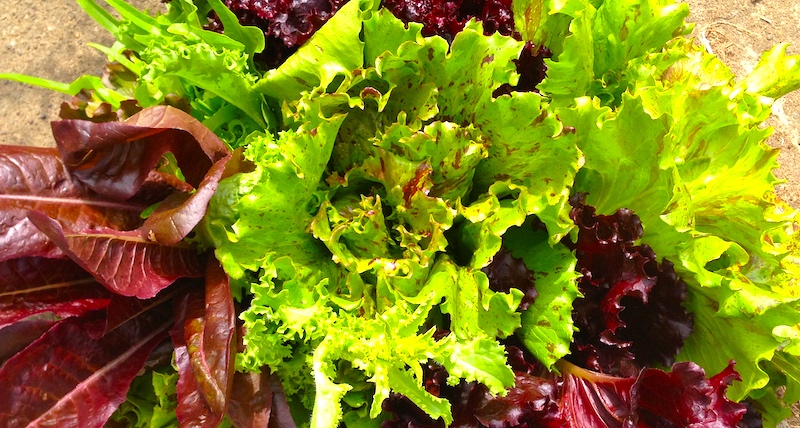
Tender and delicate spring lettuces are abundant.
On my trip to the Hillsdale Farmers Market last Sunday, I loaded up on the tender redleaf and maple leaf lettuces from Gathering Together Farm that will get a drizzle of my new favorite honey and mustard-infused red wine vinaigrette. I also picked up the cutest bunches of baby bok choy that will get roasted and incorporated into a stir fry, pizza or grain salad in the near future.
Greenville Farms from Forest Grove was full to bursting with stacks of various kinds of raabs and other sprouting greens, from collard to kale to spigarello. I can safely say that next to spring lettuces, these inflorescences are the spring vegetable I most look forward to after the end of my beloved chicory season. Read Ginger's explainer about the various varieties grown locally, along with a recipe for a balsamic reduction that is nothing short of miraculous.
Garlic scapes add zing to spring dishes.
Greens like arugula, spinach and sorrel (see my recipe for a killer sorrel salad) are seeing their day in the spring sun, too, along with local fennel and peas—both sugar snap and snow peas—which should be plentiful through May. Zucchini and other summer squashes like patty pan and the ribbed costata romanesco, all ideal for grilling or roasting, will be around into June.
And don't forget spring herbs like parsley and cilantro, oregano, chervil, thyme and chives are here, too, so chimichurries and other herb sauces are definitely called for. Microgreens and young shoots of favas and peas should also make your list. They will only get more abundant as the season rolls along.
Mmmmm…rhubarb crisp!
And I can't conclude this without mentioning my true heartthrob, rhubarb, that vegetable-masquerading-as-a-fruit, that is one of the first desserts of spring, at least around here. See my version of my Aunt Nell's Rhubarb Crisp below, and be sure to make my spectacular rhubarb syrup for your summer sippers and cocktails.
Excited about spring now? I sure am!
Aunt Nell's Rhubarb Crisp
For the topping: 1 c. flour 3/4 c. uncooked rolled oats 1 c. brown sugar 1/2 Tbsp. cinnamon 1/2 c. butter or margarine, melted
For the filling: 4-6 c. rhubarb, cut in 1/4" slices 1 c. sugar 1/4 c. triple sec, Cointreau or other orange liqueur 2 Tbsp. cornstarch
Mix together dry ingredients in medium sized bowl. Pour in melted butter or margarine and stir with fork to distribute. When well-mixed and crumbly, scatter on top of fruit in pan (below).
Slice fruit into large mixing bowl. Add sugar, water, cornstarch and vanilla and mix thoroughly. Put in 9” by 12” by 2” baking pan. Scatter topping mixture evenly over the top and bake in 350 degree oven for 55 min.
It all started with those little, bright green, lantern-shaped peppers called pimientos de padrón—known more familiarly as "padrons"—that only required a quick blistering in hot oil and shower of salt to melt my knees as soon as I popped one in my mouth. For awhile they were only available from one vendor—the late, lamented Viridian Farms at the Portland Farmers Market—but pretty soon they were being featured on the hottest chef's menus all over town.
A couple of years later I heard about another Spanish delicacy that had appeared on Viridian's roster, a spring onion called calçot (pron. cahl-SOH). In Spain they're harvested from November through April, and festivals known as calçotadas are held in towns all over the region.
Cooked on a hot grill until the outside layer is blackened but not charred and the inside is soft and creamy, the blackened outside layer is peeled off and the remaining onion is dunked in a tangy romesco-like sauce called salbitxada(sahl-beet-SHAH-dah). Then, holding the onion aloft by the greens, the trick is to lower the soft, saucy white part into your mouth and bite it off without having the sauce dribble all over your face. (This video explains it better than I ever could.)
With calçot season upon us, we finally held our own mini-calçotada on the patio. Traditionally served with beer and a variety of grilled meats, for our home version of a calçotada, Dave quickly grilled bone-in pork chops and I made an herbed rice pilaf with chopped tarragon, red-veined sorrel and parsley from the garden…though the drips on our shirts signaled that we may need some more practice on the eating portion of this spring festival.
Calçots with Salbitxada Sauce
For the salbitxada sauce: 4 Tbsp. blanched almonds 4 fresh bitxo peppers (or other mildly hot pepper), coarsely chopped, seeds and membranes removed 8 cloves garlic, peeled 4 ripe tomatoes, roughly chopped 2 Tbsp. chopped parsley 1/4 c. bread crumbs 1 Tbsp. smoked paprika 2 Tbsp. red wine vinegar 1 c. olive oil Salt and pepper to taste
For the grilled calçots: 2-3 bunches (20-30) Spanish calçots or very young spring onions with long greens and a very small bulb
Heat oven to 350°.
Place almonds in hot oven to toast for 5-7 minutes. Place in a food processor and coarsely grind.
Mash ground almonds, peppers and garlic into a paste with a food processor. Add tomatoes, parsley and vinegar. Pulsing the food processor, drizzle in the olive oil until sauce becomes thick. Add salt and pepper to taste. (This sauce is terrific with any grilled vegetable. During summer months, consider serving it with grilled steaks or chops.)
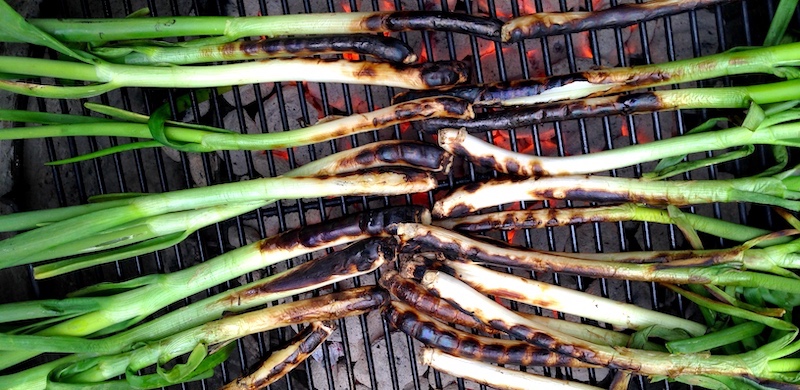
To prepare the calçots, simple build a hot fire in a grill. On the grate over the coals, spread out the calçots with the white end facing the center of the grill and the greens extending over the outside edge of the grill (top photo). Grill, turning occasionally, so the outside is blackened but not charred and the whites feel tender when squeezed.
To serve, pull the calçots off the grill and peel off the blackened outer skin with your fingers. Grasping the greens in your hand, dunk the white part in the salbitxada sauce, raise the onion aloft and lower the white into your mouth, biting it off at the top of the white portion. When the calçots are all gone, whomever has dribbled the least sauce (or, I suppose, the most) on themselves is the winner!


 Across the street in front of our house was another row of houses identical to ours, beyond which stretched another field, this one planted with row upon row of corn. All the kids on our street would play hide-and-seek in that field, losing each other in the sameness of the shadowy stalks that stretched into the sky, their tassels glowing in the evening light. During the late summer I'd often wander off into the field on my own and pick an ear or two, peeling back the green husk and nibbling the sweet raw corn that always tasted better than anything boiled and buttered, and only emerge when I heard my mother calling from the front porch to come in for dinner.
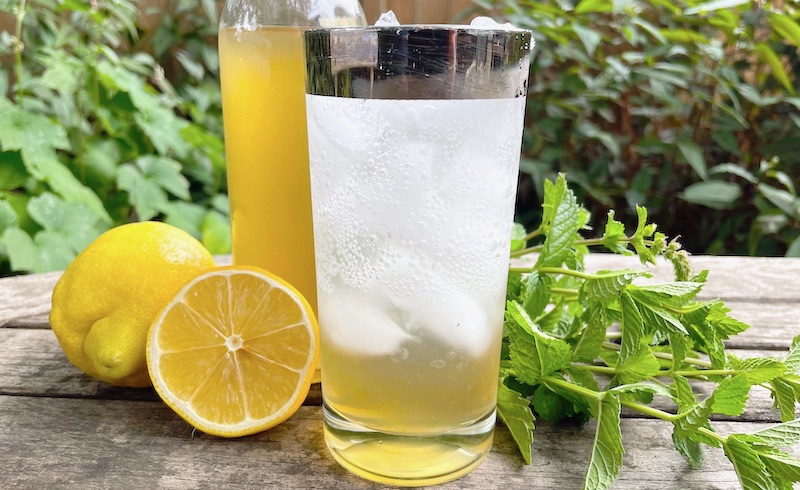
 This year, just as the early July heat wave was hitting the Northwest with a vengeance, our


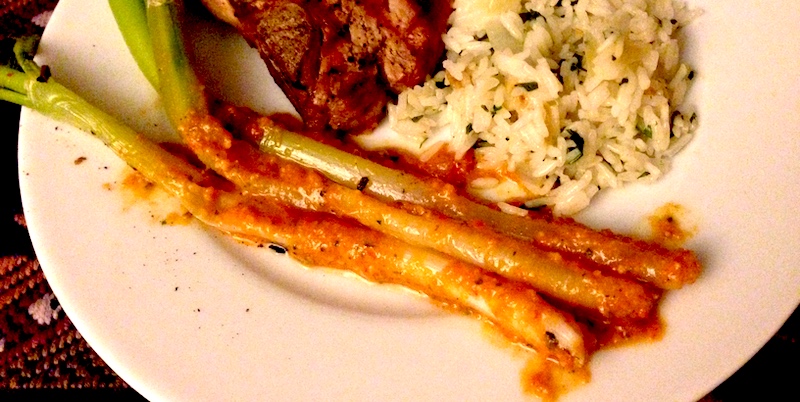 Cooked on a hot grill until the outside layer is blackened but not charred and the inside is soft and creamy, the blackened outside layer is peeled off and the remaining onion is dunked in a tangy romesco-like sauce called salbitxada (sahl-beet-SHAH-dah). Then, holding the onion aloft by the greens, the trick is to lower the soft, saucy white part into your mouth and bite it off without having the sauce dribble all over your face. (