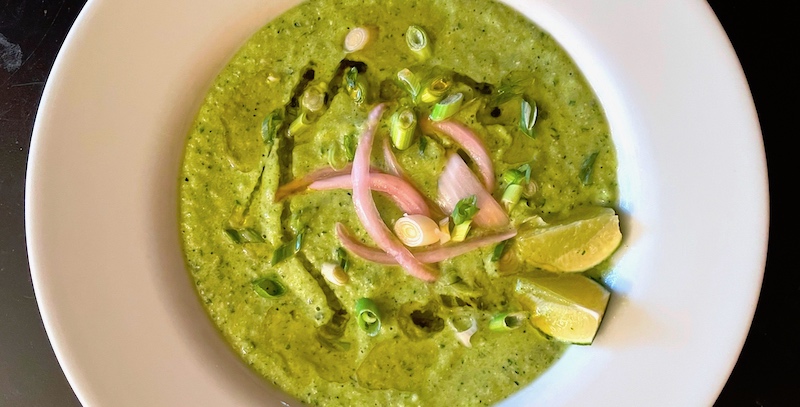
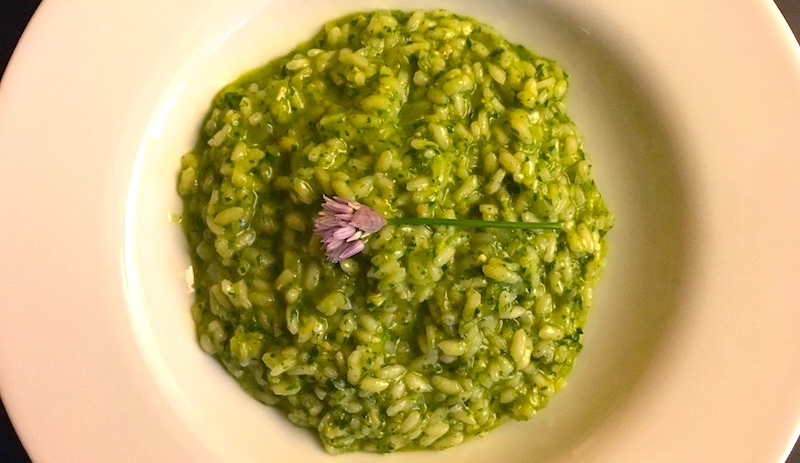
I first saw this spectacular dish years ago among the drool-worthy photos at Portland's late, lamented Florentine outpost, Burrasca, and was intrigued with its verdant green color and creamy texture. You see, we eat a lot of risotto around here, since it's easy to adapt to whatever you have in your pantry or vegetable bin—it's quick, around twenty minutes cooking time—and, in summer, doesn't heat up the kitchen. Summer is also when fresh herbs are plentiful in gardens and at farmers' markets.
Plus, if you make it in the summer and get too warm standing in front of the stove, you are allowed a glass (or more, depending on how quickly you drain it) of a chilled white or rosé.
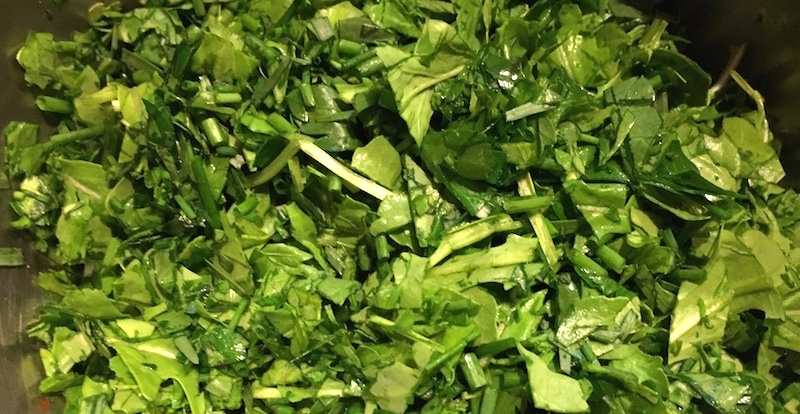
For this particular recipe, I had on hand a fair amount of arugula and parsley I'd bought at the farmers' market over the weekend, as well as chives and tarragon from the garden, but you can use any greens that come to hand, like spinach, chard, sorrel, kale, chervil, dill, basil or the like. Eminently flexible, you can design your own flavor profile—I'd only caution you to not overload the mixture with stronger-tasting herbs, but let them weave in and out of the milder ones.
Risotto Alle Erbe/Herb Risotto
3 Tbsp. olive oil 2 Tbsp. butter or margarine Half of a medium yellow onion, chopped fine 3 cloves of garlic, minced 2 c. arborio or other short-grained rice 1 c. white or rosé wine 5 c. chicken stock 3 c. mixed green herbs (I used arugula, parsley and chives), chopped fine 2 Tbsp. tarragon, chopped fine 2 c. parmesan or romano, grated fine
Heat olive oil and butter over medium heat in large saucepan until it shimmers, then add onion and sauté until translucent. Add garlic and sauté briefly, then add rice and sauté for 2 minutes, stirring constantly to prevent sticking.
Add wine and stir until it is absorbed into the rice, then begin adding stock a ladle-full at a time, stirring frequently, allowing the stock to be absorbed before adding more (I keep the stock warming in a pot on a nearby burner—it absorbs much more quickly when it's hot). When about half the stock has been used, add the finely chopped herbs and stir them in until they wilt slightly, then continue adding the stock until the rice is slightly chewy and the risotto has a creamy texture. Add 1/2 c. parmesan and stir to combine. Serve immediately.
My family loves jam—Dave's homemade sourdough toasted in our old-school two-slice toaster is most of the reason—so this time of year I make a lot of it. And I'm talking about gallons of the stuff, enough to last us until the fruit ripens again next summer. So far this summer alone I've made raspberry, marionberry, strawberry, blackberry and two kinds of plum jam, with Dave's special citrus marmalade rounding out the selection.
I'm not confident enough to start playing around with spices to my repertoire, and I do love the forthright flavors of the fruits all by themselves. There are those who make exotic combinations like plum cardamom or apricot chanterelle, both from my friend Jennifer Bright, my polestar for preserving ideas—see this recipe for Prune Plum Jam with Fennel Seed for a taste. (Her blog Culinaria Eugenius, from her previous life in Eugene, is a trove of recipes and inspiration.)
It's so simple to make perfect jam with this quick and easy technique.
This summer I did have a breakthrough when I ran across a blog called Divas Can Cook by Monique Kilgore, which she describes as centering on African-American Southern Cuisine. Her recipe for strawberry jam without pectin describes a technique calling for combining the fruit with sugar, warming it to melt the sugar, then bringing it to a rolling boil until it reaches 220 degrees. Done!
For me this eliminates the "will it set" problem of either runny preserves or a set that is too hard (and probably overcooked), plus the hassle of the plate-in-the-freezer, is-it-done guesswork. I've now used her technique with all the fruit jams I've made so far and they've all been exactly the right not-too-runny, not-too-thick consistency we love—Goldilocks would be so pleased! So thanks to Monique for setting me on the right path.
Fruit Jam
Adapted from Divas Can Cook by Monique Kilgore
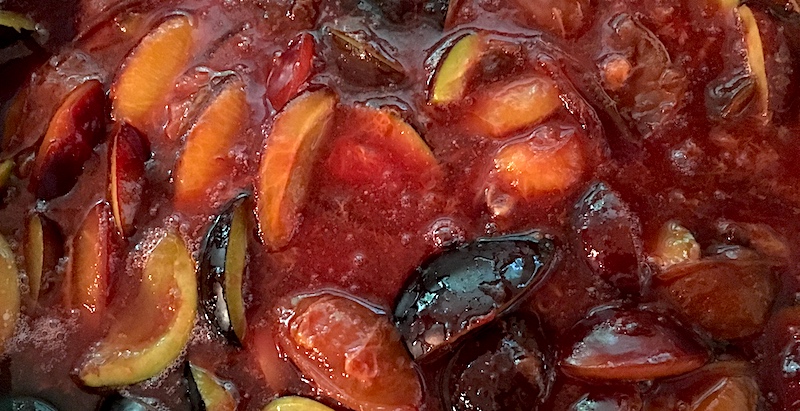
So far I've used this technique to make strawberry, blackberry, marionberry, raspberry and plum preserves with excellent results.
1 lb. fresh fruit 1 1/4 c. sugar 1-2 Tbsp. fresh-squeezed lemon juice
Combine fruit with sugar and lemon juice in a large pot or Dutch oven. (If you have more than one pound of fruit, I use the same proportions as above for sugar and lemon juice.) Allow the fruit to sit and macerate for 15 minutes, then place over medium heat and simmer for 15 minutes until the sugar melts completely. (Kilgore mashes the fruit at this point for an even consistency, but I like my jam to have some texture so I skip that step.)
When the sugar has melted, turn up the heat and bring the fruit to a rolling boil and continue cooking until the temperature of the jam reaches 220 degrees. At that point transfer the jam to clean glass jars. If you're freezing the jam, simply allow it to cool to room temperature and transfer to your freezer. If you want shelf-stable jam, process the sealed jars in a water-bath canner following the canner directions.
Love figs? Get my recipe for a spectacular Balsamic Fig Jam that is amazing with cheeses or on toast.
I know, I know, calling a particular drink "the best cocktail" is hyperbole on the scale of saying one religion is the true path and everyone else is going to H-E-double toothpicks. And there are going to be comments like, "Whaddaya mean..." and "You're fulla..." But, doggone it, it's my favorite and I'm not afraid to say it.
Now, I've had lots of other great cocktails. After all, there is such a thing as due diligence in these matters and I'm all about fair play. Martinis, Manhattans, mojitos, lemon drops, G&Ts, sidecars, toddies...I could go on. But the Negroni is the one I always come back to as my touchstone, especially as made by my favorite bartender.
Serving over ice on hot summer days is allowed. (We won't tell!)
And it's not for everyone. You have to have a taste for the bitter (Campari) along with the sweet (vermouth). And the perfect accompaniment is a twist of lemon, though many practitioners are trying to substitute orange peel—in my opinion giving the drink a cloying oiliness rather than the zing that lemon rind contributes.
So if you're ready to try one, here's the recipe that we've adopted as our own.
Our House Negroni
A good friend of mine described the Negroni as "the perfectly balanced cocktail when made correctly." I've got to agree. The richness of the gin, the bitter-sweetness of the Campari, the balancing acidity of the vermouth. Measure it out if you have to, free pour if you're confident enough, just make it. This is a great old-school drink that originated in the 1930's, and is making a comeback today. Big ups for this very refreshing adult beverage.
1 part Gin 1 part Campari 1/2 part Sweet Vermouth 1/2 part Dry Vermouth
Fill your cocktail shaker halfway with ice, dump in the booze, shake then strain into a chilled martini glass and garnish with a twist of lemon.
A note on the gin: I love Beefeater and Taqueray, but with this drink I actually prefer the less assertive flavor of a Gordon's Dry Gin or a similar mid-range gin. Also, if you look in a vintage bar guide, it will invariably say one part sweet vermouth with no dry vermouth. But I was shown this half-and-half method by the bartender at Bix Restaurant in San Francisco many years ago—a great "must stop" bar for you martini fans—and this rounds out the flavors perfectly. Cheers!
It's high summer. Temperatures are soaring and no one wants to heat up the house cooking dinner. You could whizz up a blender of chilled soup—check out my favorites by clicking here—or do what we do: Set up an outdoor kitchen! All it takes is a camp stove and a camp table and you're good to go.
We've set up ours on the patio just outside the kitchen door, the better to access that all-important fridge, plus water and utensils. Our trusty two-burner Coleman will boil a pot of water for pasta on one burner while cooking up the almost-instant sauce (below) on the second burner without having to break a sweat.
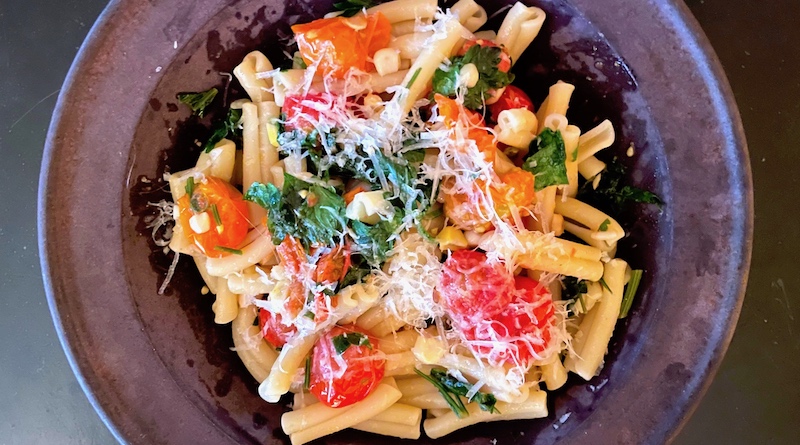
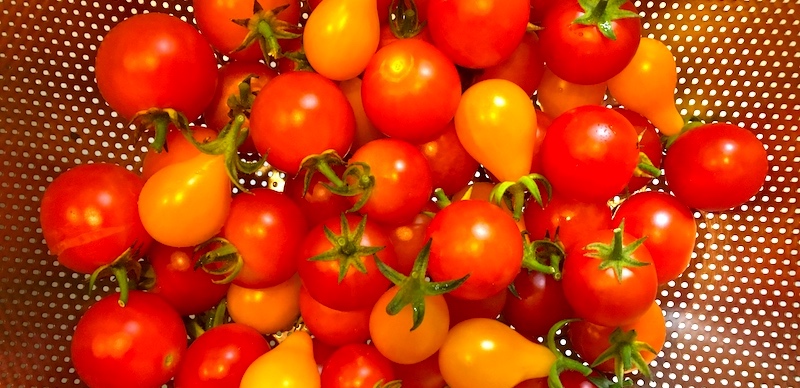
Whether you can stroll out to your garden bed and pluck your cherry tomatoes right off the vine or pull out a pint of little red orbs from your farmers' market stash, all you'll need is garlic, a tin of anchovies and olive oil to complete the dish. It's so simple you could whip it up while your guests sip gazpacho from tiny glass cups, but whether you choose to do that or just toss it in a bowl and put it in front of your family with a salad, I guarantee it'll be a dish you'll be pulling out again and again in tomato season.
Pasta with Cherry Tomatoes, Garlic and Anchovy Sauce
1 lb. pasta 3 Tbsp. olive oil 10 cloves garlic, peeled and very roughly chopped 1 tin anchovies in olive oil One pint of cherry tomatoes 1/4 tsp. red pepper flakes Salt to taste 1/4 c. Italian parsley, chopped Grated parmesan, or a 50/50 blend of pecorino and parmesan, for serving
Boil a large pot of water for pasta.
Just before the water comes to a boil, start the sauce by heating the olive oil in a deep frying pan over medium-high heat. When it shimmers, add the chopped garlic and sauté until fragrant, about 30 seconds. Add the anchovies and their oil and mash until the anchovies dissolve, then add the whole cherry tomatoes and red pepper flakes.
Add the pasta to the (now) boiling water and cook until al dente. Continue cooking the sauce until the tomatoes burst and give up their juices, then reduce the heat to low until the pasta is done. Drain pasta in a colander and place in a heated serving bowl. Pour the sauce over the pasta and sprinkle with some of the parmesan.
I must have been around four years old. My family lived in a fifties-style ranch on a one block-long street of similar houses in Tigard, an early patch of development in what would become the suburban sprawl that quickly surrounded Portland in the 1960s and 70s.
At the back of the house, the edge of our neatly mowed, unfenced green lawn bordered on a field of wildflowers where I'd wander, picking bouquets to bring to my mother. It would eventually become a parking lot for a giant strip mall, but to my four-year-old self it was a vast prairie, a place for catching and studying the birds and bugs that lived there or spending what seemed like hours laying there and looking up at the clouds passing overhead.
Across the street in front of our house was another row of houses identical to ours, beyond which stretched another field, this one planted with row upon row of corn. All the kids on our street would play hide-and-seek in that field, losing each other in the sameness of the shadowy stalks that stretched into the sky, their tassels glowing in the evening light. During the late summer I'd often wander off into the field on my own and pick an ear or two, peeling back the green husk and nibbling the sweet raw corn that always tasted better than anything boiled and buttered, and only emerge when I heard my mother calling from the front porch to come in for dinner.
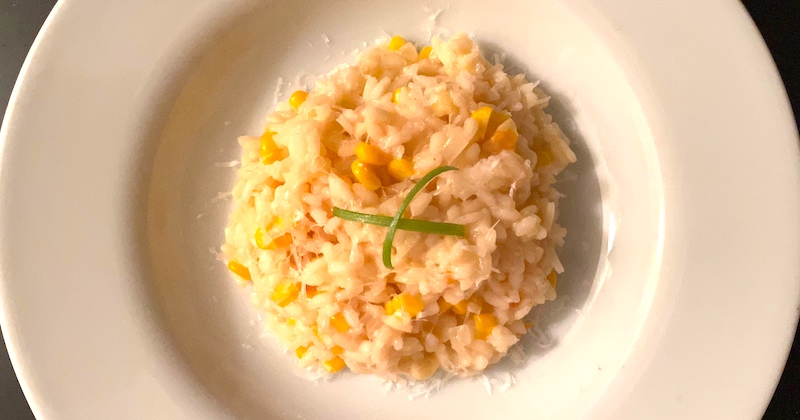
So when it's corn season and there's no field across the street to wander off into, I'll bring home an armload from the farmers' market, husk a few ears, scrape off the kernels and cook up a batch of corn stock from the cobs to make a corn risotto that brings back, if only for a few moments, that sweet memory from my childhood.
Sweet Corn Risotto
1 Tbsp. olive oil 1 Tbsp. butter or margarine 1/2 yellow onion, chopped fine 2 cloves garlic, minced 2 c. arborio rice 2 c. corn kernels 5 c. corn stock 1/2 c. parmesan Salt and pepper, to taste
To make corn stock, cut kernels off of five corn cobs. Put kernels in a bowl and set aside. Place cobs in large saucepan and cover with 5 cups water. Bring to a boil, then reduce heat to simmer for 15 to 20 minutes. Remove cobs and strain stock through wire mesh sieve to remove any debris.
Melt butter and oil in 2 1/2-3 qt. heavy-bottomed sauce pan. Add onion and garlic and sauté over medium heat till translucent. Add rice and stir for about 30 seconds till grains are hot and coated with butter mixture. Add corn and combine. Stirring frequently, add stock one ladle-full at a time, allowing rice to absorb it before adding more. When rice is tender but still slightly al dente, stir in cheese. Add salt and pepper, adjusting to taste.
My neighbors Bill and Jen have been a driving force behind many of my culinary explorations, with their extensive garden and Bill's consuming interest in fermentation. Jen, too, comes from a long line of picklers and preservers—check out her great-grandmother's refrigerator pickles recipe—and Bill turned me on to homemade shrubs like his cantaloupe and mint shrub.
Last year he gave me a bushel of purple shiso to play with, which led me to Andrea Nguyen's inspiring website, Viet World Kitchen, about all things Vietnamese—her Vietnamese Food Any Day cookbook has changed my cooking on a basic level—and her recipe for Vietnamese Shiso (Tia To) Shrub. I made several batches and we enjoyed them all summer long.
This year, just as the early July heat wave was hitting the Northwest with a vengeance, our Stoneboat Farm CSA was offering fennel as part of the share. Fennel's long wavy fronds are normally a source of annoyance since they've gone straight to the compost bin, but this time I asked my friend Melinda if there was a use for them. "Fennel fronds?!?" she exclaimed, her eyes lighting up at the thought. "Candied fennel! Syrup! Pesto!"
Okay, then—I now feel badly about dumping them all these years. But no more!
The pesto was made and enjoyed with a salmon fillet we grilled a couple of days later, and I made a syrup from the leftover stalks. It was good, but wasn't thrilling…until my son mentioned he'd made a soda with some of the syrup and had added a splash of tarragon vinegar to make it sing. And did it ever!
Don't get me wrong, I'm still in love with Andrea's shiso drinking vinegar, but this one may be the hit of this summer's beverage bar.
Fennel-Tarragon Drinking Vinegar
4 c. fennel fronds, sliced in 3" lengths 6 c. water 6 c. sugar 2 c. tarragon vinegar (see below)
In a large saucepan over medium heat, combine water, sugar and fennel fronds. Bring to a boil and turn off heat. Cover pan and allow to steep for 2-3 hours until syrup cools. Add vinegar and stir. Bottle and store in refrigerator (makes about two quarts); will keep for several weeks.
To make a beverage, fill an 8 oz. drinking glass with ice. Add 1 oz. drinking vinegar. Fill with club soda. Stir, adding more syrup or soda to taste. Garnish with lemon, mint, etc., if desired.
Tarragon Vinegar
Fresh tarragon White wine vinegar
Fill a couple of pint jars with tarragon sprigs—feel free to pack them in, but not too tightly; you need room for the vinegar, after all! Fill with vinegar to within 1/2" of rim. Place tight-fitting lid on the jar and store in a cool, dark place (like a basement) for 2 weeks. Using a fine mesh strainer, strain out the sprigs. Bottle (I save my empty vinegar bottles for just this purpose) and store in refrigerator.
Summer and zucchini go together like Dizzy Gillespie and his trumpet, Einstein and relativity, Dorothy Parker and snark. Eaten raw right off the vine, lightly steamed, grilled, pickled or pulverized, their mild flavor and chameleon-like ability to mimic their surroundings makes them a ubiquitous choice for summer meals and snacking.
Ridiculously inexpensive to buy and so abundant in the garden that they've earned a reputation for midnight distribution on neighbors' porches, my CSA had a "take all you want" sign over a bin of them at the farmers' market last week. And since I have a hard time not taking advantage of that kind of offer, I came home with several pounds of green, yellow and striped versions.
The blistering heat of the last few days made the idea of turning on a burner a complete non-starter, but I had the good fortune to run across Hetty Lui McKinnon's recipe for a cold zucchini soup—her inclusion of miso definitely intrigued me—involving nothing more than plugging in a blender, plus I had enough of the ingredients to be able to riff on her basic instructions.
With minimal chopping and a few snips of garden herbs, within 30 minutes dinner was on the table and the house was none the hotter for the effort. I'm now secretly hoping for some middle-of-the-night donations to mysteriously appear on my porch (hint, hint).
Chilled Zucchini Soup with Miso
1/2 c. raw cashews 2 c. vegetable stock (or 1 c. chicken stock 1 c. water) 6 Tbsp. lemon juice 2 lbs. zucchini, roughly chopped 1 c. herbs, roughly chopped (I used a combination of parsley, mint, cilantro and lemon basil) 1 c. fennel, roughly chopped 1/2 ripe avocado 3 garlic cloves, roughly chopped 3-4 Tbsp. white (shiro) miso Salt, to taste Condiments: Quartered limes, pickled onions, sliced green onions, extra-virgin olive oil
Place the cashews, lemon juice and just 1/2 cup of the stock in the blender or food processor. Blend thoroughly to create a creamy liquid.
Add remaining ingredients to the blender and puree; depending on the size of your blender you may need to work in batches. Adjust salt and lemon.
Get three more of my favorite cold soup recipes that'll raise the bar on your summer entertaining. And I've heard nothing but raves for Hetty McKinnon's vegetable-centric book, Tenderheart. Definitely worth checking out!
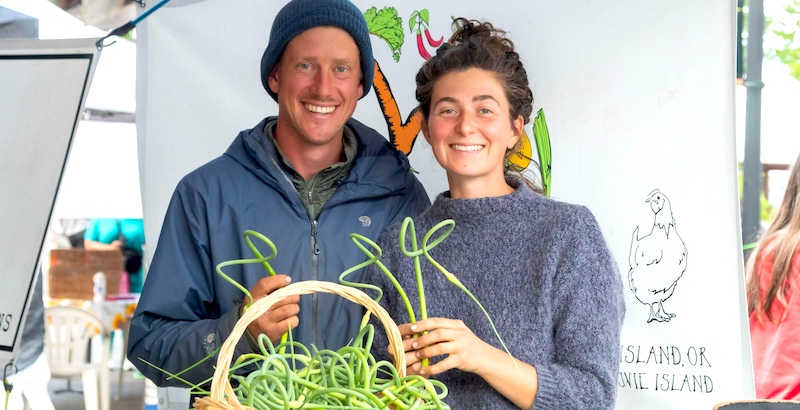
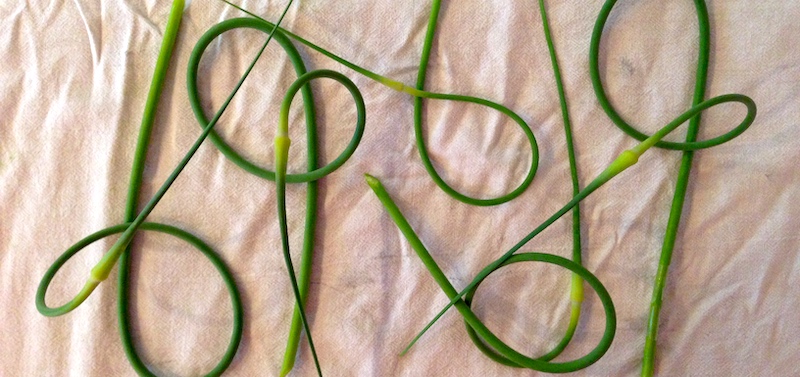
This week Market Master Ginger Rapport of the Beaverton Farmers Market sent out a primer on garlic scapes, the curly green whips that are the flowering stems of the garlic plant. They are at their tender best in late spring and early summer, when they still have their signature curl—if they're not harvested, the stems will straighten out and point skyward, by which time they also get hard and fibrous.
Rapport quotes market vendor Emma Rollins of Sun Feast Farm (top photo), who waxed eloquent about her favorite allium:
"Solstice time feels like the right moment to talk about garlic. This is when garlic scapes, the flowering stalk of garlic, curls and twirls its leek-like body in the most fantastic way! For me as a farmer, garlic scapes mark our true turn toward summer, always arriving right around the longest days of the year.
"As days lengthen, plants respond. Onions size up and the garlic needs you to pick the scape so its energy can go into the bulb, not up to the flower. If you left it, the garlic would flower in a purple pom-pom of little blooms. Each of these flowers turns to a bulbil, a little garlic seed, which is how garlic propagated itself before people began harvesting the bulb or head of garlic and breaking it up into the cloves to replant and propagate more that way.
“Why is garlic MY timekeeper? We plant garlic as the season closes, [at] Halloween time. Tucking cloves into the dark cold wet soil as so much of the field wilts back with frost for the season, garlic begins to turn the wheel toward the promise of next season. We finish the year planting into the next. We follow the sun by looking to the garlic that sprouts in the depth of winter, and come February, with the Persephone—when we enter over 10 hours of light a day, what a plant needs to actively grow—garlic marks this time and comes to life. There is green garlic before the bulb starts to form, then scapes for solstice [with] harvest come July when the stalks begin to dry out and sometimes tip over.”
So once you get your garlic scapes home, then what?
These flowering stems of the garlic plant present myriad delicious opportunities.
The simplest way to prepare them is simply throwing them on the grill after trimming off the end of the stalk. (Some recipes will have you coat them in oil, but I find that the oil drips off and causes the coals to flame up, which deposits a bitter film of burnt oil on your vegetables.) After a couple of minutes the scapes will brown over the fire, so turn them over and brown the other side. Then put them on a plate and drizzle with a good olive oil, salt and maybe a squeeze of fresh lemon. The easiest side dish or appetizer ever!
Just this last week I made a pesto from fresh scapes, processing five or six with a big handful of parsley from my neighbor's garden along with the requisite garlic, pine nuts (or walnuts or hazelnuts) and enough olive oil to make a smooth paste. Stir in some finely grated parmesan and you're ready to stir it into pasta or garnish a piece of salmon.
Rapport reports that her assistant market manager, Sue Poff, received a jar of garlic scape powder "made by her son who grows a ton of garlic every year" and she describes the flavor as "milder than regular garlic powder but used in much the same way." Easily dried if you own a dehydrator—drying them in the oven at its lowest setting is just as simple, though it may take longer—just slice the scapes into one to two-inch pieces and, once dried, grind them to a powder in a spice grinder or blender.
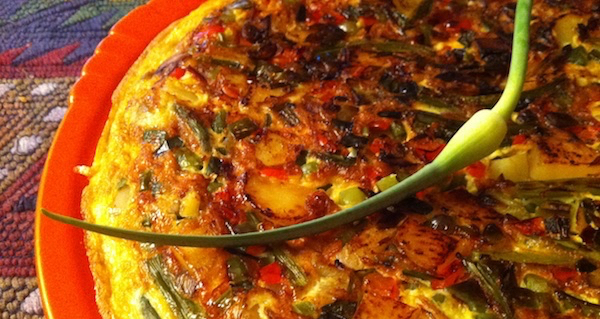
Garlic Scape Frittata
I love frittatas because they can be made from whatever vegetables or meats you happen to have on hand, sautéed and combined with eggs. Quick and easy, forgiving and always delicious, it's almost the perfect meal!
2 Tbsp. butter or olive oil 1/2 each green, red and ancho peppers, or about a heaping cup of any peppers, finely chopped 4 green onions, sliced into 1/8" slivers 4-6 mushrooms, halved and sliced thinly 5 garlic scapes, sliced in 1" pieces, leaving the bulbs intact 6 baby Yukon Gold potatoes (1 cup) chopped in 1/4" cubes 12 eggs 1/2 c. cheese, grated Salt and pepper to taste
Melt the butter over medium heat until it sizzles. Add potatoes and sauté briefly till slightly tender. Add rest of vegetables and sauté until very tender. While vegetables are cooking, break eggs into a mixing bowl and stir until well-mixed, adding salt to taste. When vegetables are done, pour the eggs over the top, sprinkle on the cheese and cover the pan, reducing the heat to low.
When the eggs are cooked on the bottom but still runny on top, put the pan under the broiler briefly (just don't walk away or get distracted like I sometimes do!). When lightly browned on top, remove the pan from the broiler.
To serve, run a spatula around the inside of the skillet to loosen the eggs. Then invert a serving platter over the skillet and, holding them firmly together, turn the platter and skillet upside down. The frittata should plop out of the skillet onto the platter.
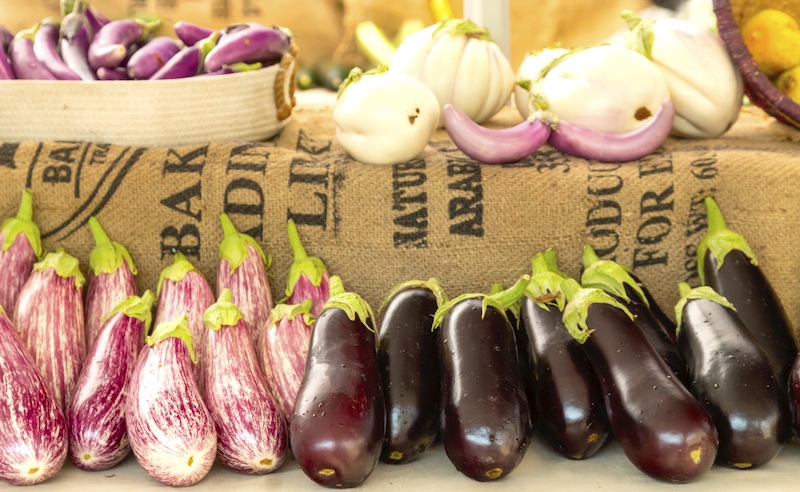
In the most recent Beaverton Farmers Market newsletter, Market Master Ginger Rapport waxed eloquent about the eggplants grown by one of the market vendors and included some recipes I definitely want to make.
Farmer Eric Hvidsten of Black Dirt Farm was not always in love with eggplant and explained how his opinion changed since he started growing them:
Eric Hvidsten, Black Dirt Farm.
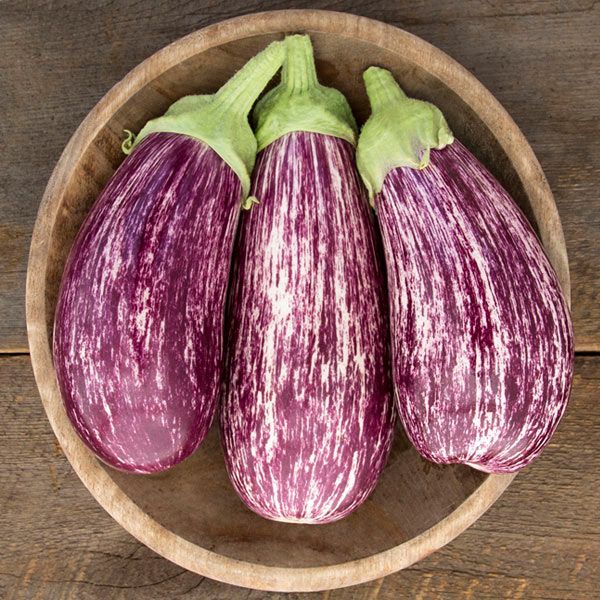
“Over the past few years, I've come to really enjoy growing eggplant," Hvidsten said. "They are absolutely gorgeous, and it's been fun exploring and experimenting with different varieties. 'Annina' is the variety that first got me hooked. Its flavor is similar to the typical Italian eggplant, but it has beautiful purple and white speckled skin that looks like marble. It looks unreal. I'm growing a long slender Japanese variety for the first time this year. It might be my favorite to cook with. Its tender skin and smaller diameter make it easy to slice into long strips or small coins. A lot of customers have recommended round Thai eggplant this year. I'm looking forward to trying these out next season.
Eggplant bites (recipe below).
"Growing up, I was not a fan of eggplant. Eggplant Parmesan was the main eggplant dish in our house. I found it mushy and sometimes bitter. As I've experimented with new dishes I've come to really enjoy them. (See recipes linked at bottom.)
"I think its flavor really shines when paired with Greek or Middle Eastern spices like za'atar. I've also found slicing it thin and frying it briefly before adding it to the rest of the dish keeps the eggplant from getting mushy. This discovery was a game-changer for me."
"Annina" got Hvidsten hooked on growing eggplants.
As for what it's like as to grow them, Hvidsten said, "Eggplant has grown well on my farm, but it can be a challenge. They are relatively heavy feeders—home gardeners will want to amend the soil well before planting. The big challenge growing eggplant in the PNW is that they like heat. I always grow eggplant in my hoop house. For home gardeners I recommend planting eggplant in the warmest spot available.”
About how he started Black Dirt Farm, Eric said, “I started Black Dirt Farm six years ago with the goal of growing good food for my neighbors in a way that would benefit my local community, economy, and environment. I strive to work with nature to improve the soil, control pests and diseases, and grow healthy plants. Despite the challenges, it has been a joy to grow the farm and build relationships with my customers and other growers in the area. Growing with the seasons, and working with nature gives me a wonderful sense of connection to the world around me. I am so thankful for all my customers who support the farm and help me live this dream.“
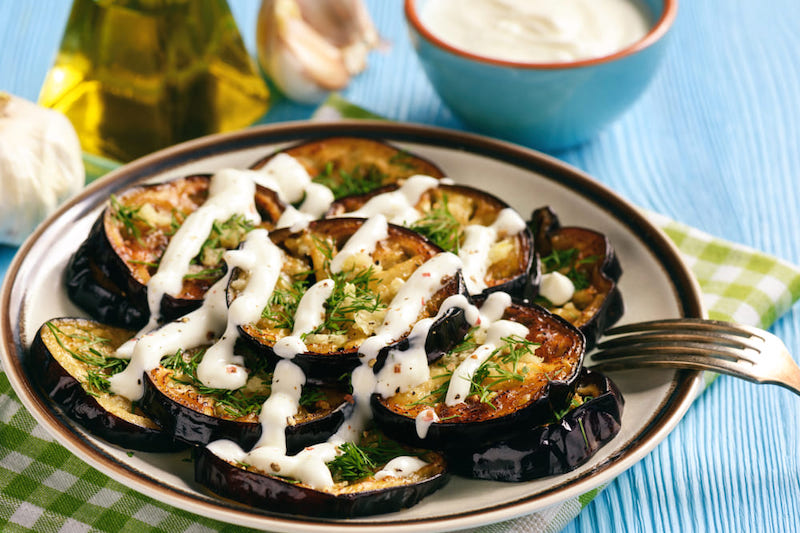
Simple Eggplant Bites
4 Tbsp. vegetable oil 2 medium-sized eggplants 4 Tbsp. flour 2 cloves garlic Dill sprigs, chopped finely, plus more for garnish 2 Tbsp. plain Greek yogurt or mayo
Cut eggplants into ½ inch slices. Pat dry and dip into flour.
Oil has to be very hot before frying the eggplants. Fry both sides for about 2 minutes each. In the meantime, crush garlic, mix with yogurt or mayo, and add dill. Once the eggplant is golden-brown, set on a paper towel to drain excess oil, sprinkle it with sea salt, and drizzle sauce on top. This makes a perfect quick appetizer!
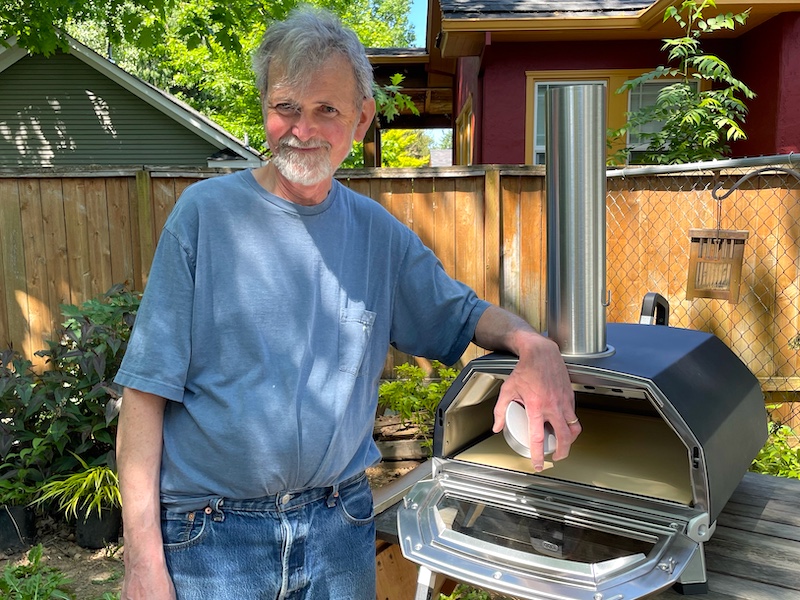
There's a new member of the family I've been meaning to introduce, and now seems like the perfect time. And no, we didn't add another Cardigan to our two-dog herd, much to Kitty and Silas's relief.
A happy man.
A few months ago Dave mentioned that a gas and wood-burning pizza oven he'd been eyeing was on sale. Not cheap, but on sale. Now you have to know that he's been talking about wood ovens and reading books on them for years—at least a decade or more—from building a cob oven to constructing a brick oven to buying one of the newer portable pizza ovens made by companies like Ooni and Roccbox.
Several friends we know have invested in them, with varying degrees of satisfaction. Most are okay for pizzas, but what Dave wanted was an oven he could use for baking, in particular one that would be big enough to fit the cast iron lidded cooking pots he uses for baking his sourdough bread.
Success? I'd say so!
The idea was to make it feasible to bake bread in the summer, since running the oven at 500 degrees for several hours had a tendency to heat up the house to Mojave Desert levels. Plus I wanted to be able to use the oven's residual heat for roasting squash or braising meats once the bread was baked.
Oh, and it had to be one that wouldn't break our fairly limited budget. Good luck, right?
It turned out that Ooni had just come out with its Ooni Karu 16" Multi-Fuel oven that ticked all those boxes. And while it would cost several hundred dollars, the price was less that what we had estimated for the fire bricks to build our own. So I convinced him to put in an order, and it arrived a couple of weeks later.
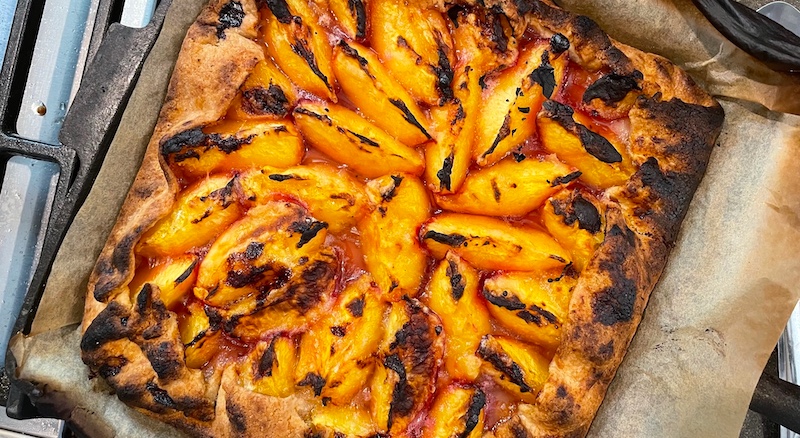
The galette of my dreams.
Since then he's been baking bread, of course, but also making galettes, cinnamon rolls, biscuits and, yes, pizza, too. I've been roasting squash, making platters of roasted vegetables from our CSA, and roasting meat for stock—the Ooni's ceramic floor fits a full-sized sheet pan. It holds the heat quite well and it's easy to stoke the fire if the temperature starts dropping.
All in all, we're looking forward to more adventures with our new family member, like the nectarine galette below that Dave made last week. I've included the instructions for baking it in the oven, but using the wood-fired option in the Ooni is almost as simple.
Nectarine Galette
For the pastry: 1 1/2 c. all-purpose flour 1 1/2 tsp. sugar 1/4 tsp. salt 1 stick plus 2 tablespoons cold unsalted butter, cut into small pieces 1/3 c. ice water
For the filling: 1 1/2 lbs. nectarines (Dave used 5 medium-sized nectarines) 2 Tbsp. flour 1/4 c. sugar Pinch of salt
Preheat the oven to 400°.
In a food processor, combine the flour with the sugar, salt and butter and process for about 5 seconds. Sprinkle the ice water over the flour mixture and process until the pastry just begins to come together, about 10 seconds; you should still be able to see small pieces of butter in it. Transfer the pastry to a work surface, gather it together and pat into a disk. Wrap the pastry in plastic or wax paper and refrigerate until chilled, about one hour. (You can also roll out the pastry and use it right away or make it ahead and refrigerate overnight.)
Cut nectarines in half and remove pits. Cut each half into thirds. Set aside.
On a lightly floured work surface, roll out the pastry to a 12-13"" square and transfer to a large parchment-lined baking sheet.
In a medium-sized bowl mix together flour, sugar and salt. Add nectarines and toss to coat. Arrange coated nectarine slices skin side down and close together onto the rolled-out crust, leaving about 1 1/2" border around the edges. Carefully fold and pinch the edges up around the nectarines.
Bake the galette for about 35-45 minutes, until the pastry is nicely browned and crisp and the nectarines are tender. Transfer to a rack and let the galette cool. Serve warm or at room temperature, with ice cream if you like.
 Plus, if you make it in the summer and get too warm standing in front of the stove, you are allowed a glass (or more, depending on how quickly you drain it) of a chilled white or rosé.
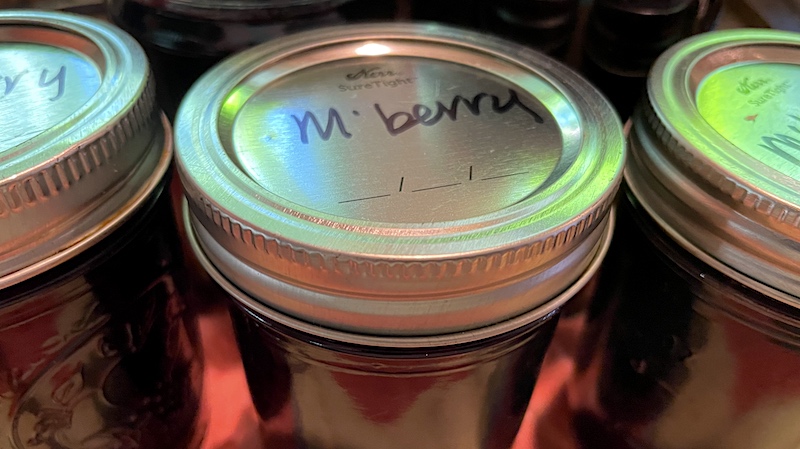


 Whether you can stroll out to your garden bed and pluck your cherry tomatoes right off the vine or pull out a pint of little red orbs from your farmers' market stash, all you'll need is garlic, a tin of anchovies and olive oil to complete the dish. It's so simple you could whip it up while your guests sip gazpacho from tiny glass cups, but whether you choose to do that or just toss it in a bowl and put it in front of your family with a salad, I guarantee it'll be a dish you'll be pulling out again and again in tomato season.
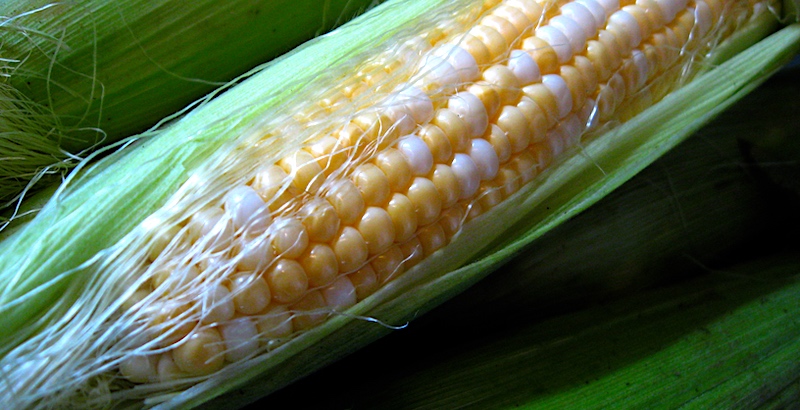
 Across the street in front of our house was another row of houses identical to ours, beyond which stretched another field, this one planted with row upon row of corn. All the kids on our street would play hide-and-seek in that field, losing each other in the sameness of the shadowy stalks that stretched into the sky, their tassels glowing in the evening light. During the late summer I'd often wander off into the field on my own and pick an ear or two, peeling back the green husk and nibbling the sweet raw corn that always tasted better than anything boiled and buttered, and only emerge when I heard my mother calling from the front porch to come in for dinner.
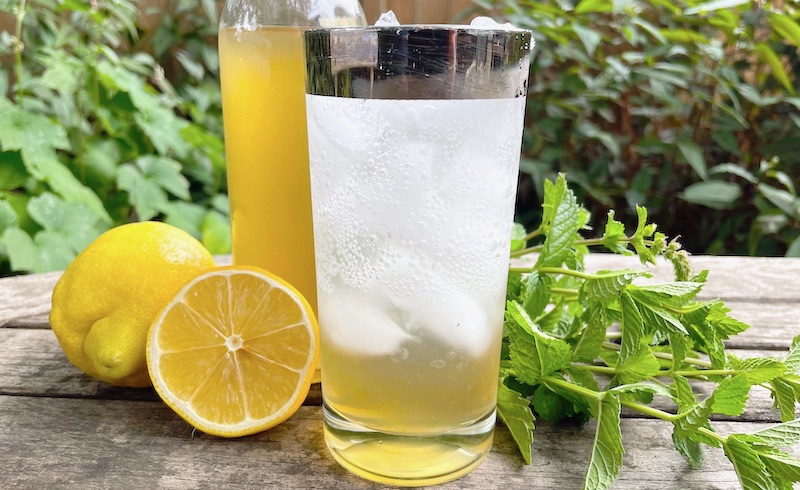
 This year, just as the early July heat wave was hitting the Northwest with a vengeance, our