Peppers are popping at our farmers' markets. When I went to the Hollywood Farmers' Market to pick up our CSA share from Stoneboat Farm then wandered the aisles to see what else I might need, there were brilliant red sweet Italian peppers, fluorescent green anaheims, sunshine-yellow sweet peppers, and grassy green serranos, jalapeños, poblanos, shisito and, of course, those sneaky-but-irresistible padrons.
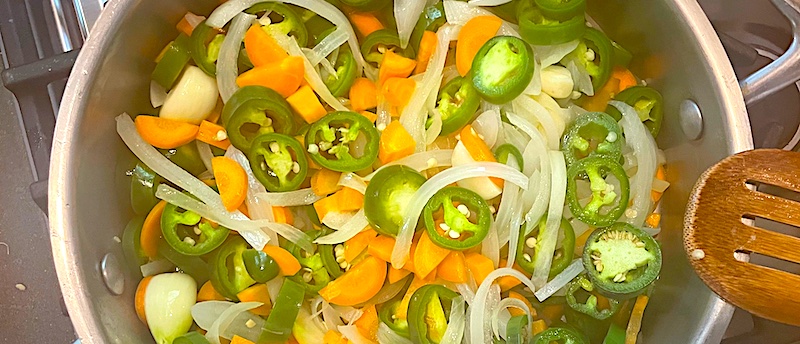
I was hoping to make Hank Shaw's Nopales en Escabeche, but in a fairly thorough search I couldn't find cactus paddles anywhere. But, instead of calling off the whole shebang, I bought a pound of jalapeños from Eloisa Organic Farm and decided to proceed with the plan, using the carrots and onion I had in my CSA bag.
The vegetables are usually sautéed briefly before simmering in the brine.
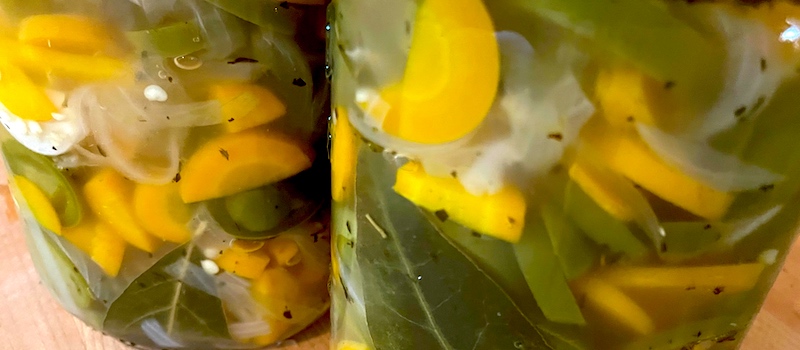
Mexican escabeche is that ubiquitous condiment familiar to anyone who's been to Mexico or has frequented an authentic Mexican restaurant. A combination of quick-pickled vegetables, it usually includes jalapeño peppers, carrots, onions and garlic, but can also have cauliflower, red onion, jicama or radishes in the mix.
The vegetables are generally sautéed for a few minutes—some recipes char the whole jalapeños in a hot cast iron pan—then the ingredients are simmered in the brine for a short period before being spooned into quart jars with the remaining brine. You can either seal them with a canning lid and, once they're cool, store them in the fridge, or water-bath can them so they're shelf-stable. The escabeche should then be ready to eat within a week and you're free to include them in tacos, tostadas, nachos, egg dishes, grilled meats or anything that could use a little pickley zing.
Mexican-style Vegetable Escabeche
1 Tbsp. neutral oil 1 lb. whole jalapeños 1 medium white, yellow or red onion, halved lengthwise, then thinly sliced vertically 3 medium carrots, halved lengthwise then sliced into thin coins or bite-size pieces 1 head of garlic, cloves separated and peeled 2 bay leaves 1 tsp. dried oregano 1/4 tsp. dried thyme 1 1/2 c. water 1 1/2 c. white vinegar or white wine vinegar
Heat oil in a large sauté pan over medium-high heat. Place onions in pan and sauté for approximately 2 minutes.
Add jalapeños, carrots and garlic into the pan and cook until fragrant, about 2 minutes. Stir frequently to prevent the vegetables from sticking and burning.
Add the rest of the ingredients to the pan and bring to a boil. Cover and reduce to a simmer for 15 minutes, or until carrots and jalapeños are tender. Remove from heat.
Using a slotted spoon, transfer vegetables into two clean wide-mouth quart jars and fill with brine that remains in pan. Place canning lids on jars and seal with canning rings. Cool to room temperature and store in fridge, or water-bath can them according to canner directions.
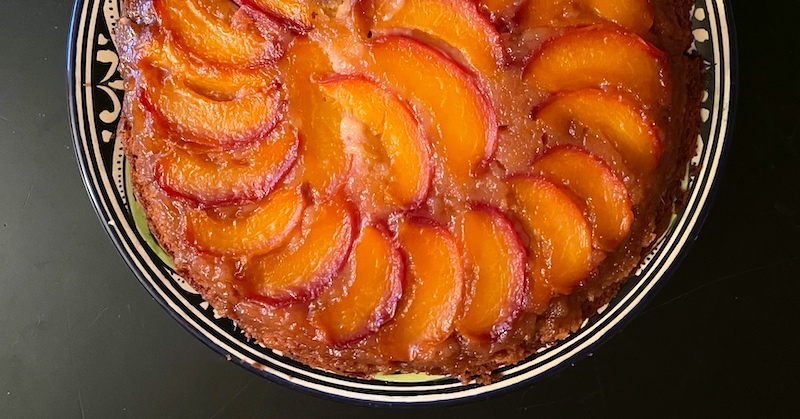
A couple of years ago I posted a recipe for a plum upside-down cake that has become a family favorite, one I make several times when plums (and particularly Italian prunes) are in season. It's a simple batter cake that comes together quickly, with a buttery, pound cake-like texture and a to-die-for caramelized, crunchy top and sides when inverted.
I made it recently when we had three small but very ripe peaches left over from Dave's foray into ice cream-making (another delicious recipe I'll share soon). They were super-flavorful Red Havens from Kiyokawa Family Orchards in Hood River that I'd found at Hollywood Farmers' Market.
And they needed to be used right away.
Since their skins were fairly thin and not too fuzzy I decided to skip peeling them, which worked quite well after baking, so if you feel like being brave and eschewing the dunk-in-boiling-water-then-in-an-ice-bath method for peeling peaches, feel free!
Peach Upside-Down Cake
For the baking pan/dish: 3/4 c.butter, softened, divided 1/2 c. packed brown sugar (for buttered pan)
For the cake: 2 c. fresh peaches (3 small or 2 large), sliced into wedges 3/4 c. sugar 1 lg. egg 1 tsp. vanilla extract 1 1/4 c. all-purpose flour 1 1/4 tsp. baking powder 1/4 tsp. salt 1/2 c. milk
Preheat oven to 350°.
Melt 1/4 cup butter; pour into an ungreased 9-in. round baking pan. Sprinkle with brown sugar. Arrange peach slices in a single layer over sugar.
In a large bowl, cream sugar and remaining butter until light and fluffy, 5-7 minutes. Beat in egg and vanilla. Combine the flour, baking powder and salt; add to creamed mixture alternately with milk, beating well after each addition. Spoon over peach slices and smooth top.
Bake until a toothpick inserted in the center comes out clean, 45-50 minutes. Cool for 10 minutes before inverting onto a serving plate. Serve warm or at room temp.
I am loving our neighborhood co-op, the Alberta Co-operative Grocery. I admit to being stuck in the supermarket chain rut until its employees called for a boycott after two years of working without a contract, and we were forced to find an alternative. Fast.
The change, frankly, has been revelatory…while the store itself is much smaller, the co-op seems to have just about everything we normally shop for, the brands it carries favor local producers and the bulk of the goods—including the bulk goods—tend to be organic. The prices are much better than at the chains, too, and between our Stoneboat Farm CSA and the co-op, our grocery bill is noticeably reduced. It even has a senior day every Tuesday for 10 percent off your total bill.
Right out of the broiler (above) or served at room temp, this recipe is a keeper!
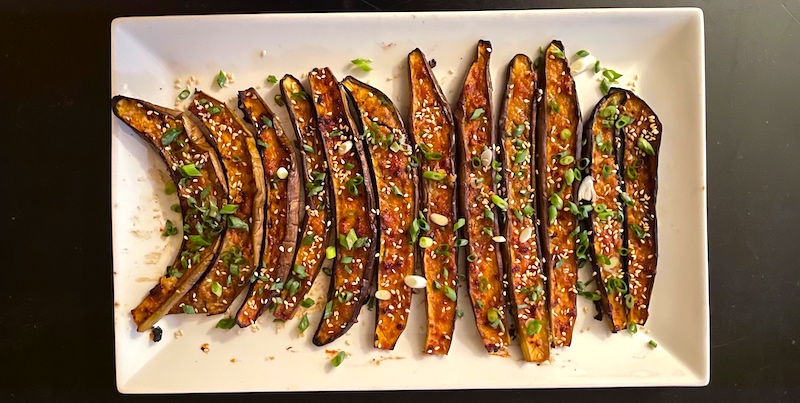
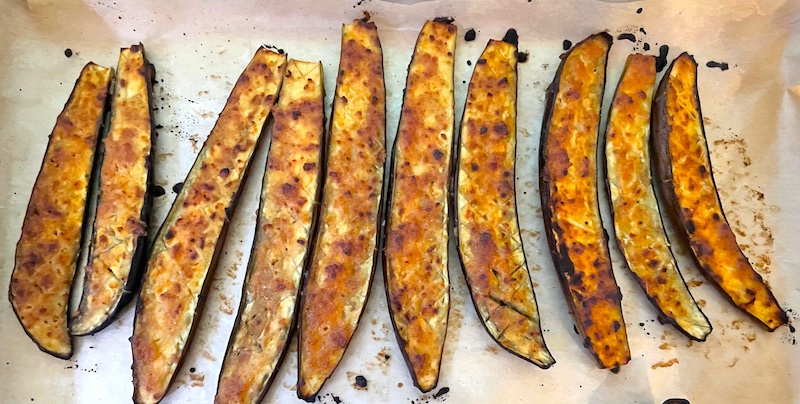
I was checking out the other day (yes, a Tuesday) when the cashier asked me what I was going to make with the miso I had in my cart. Since I'm putting miso in just about everything these days, I rattled off a list of my favorites. She then began describing her latest favorite featuring miso, a miso-glazed roasted eggplant, and how much her up-till-then eggplant-hating husband had done a 180 on the vegetable after she made it for him.
I was sold.
After arriving home I sat down and looked up several recipes (some even in actual books) all with some similarities to the one my cashier friend had described, but none was exactly the same, so I was left to wing it. While my guys are not eggplant averse—Who could dislike the cheesy goodness that is this Eggplant Parmesan?—they flipped out over the version of roasted Japanese eggplant in the recipe below.
I'll keep working on it to see how it holds up with different sizes of the fruit, but I'd recomment sticking with smaller-sized fruits or, better yet, the long Japanese varieties.
Miso-Glazed Eggplant
For the eggplant: 6 Japanese (long) eggplants, approx. 3-4 oz. each 2 Tbsp. toasted sesame oil
For the glaze: 4 Tbsp. miso (white or red) 1-2 Tbsp. sugar or honey, depending on how sweet you want it 2 Tbsp. mirin or dry white wine 1 Tbsp. fish sauce 1 large clove garlic, pressed or finely minced Toasted sesame seeds (optional) Slivered green onions (optional)
Preheat oven to 450°.
Slice off the stems of the eggplants and remove any remaining bits of the cap. Slice eggplants in half lengthwise and, with a paring knife, score the cut side of the eggplants in a crosshatch pattern about 1/8” deep. Brush with toasted sesame oil. Place cut-side down on a parchment-lined baking sheet and roast in the oven for 10 minutes.
While the eggplant is roasting, put all the ingredients for the glaze in a small mixing bowl and combine well.
Remove the eggplant from the oven and turn up the temperature to 500°.
Carefully turn over the halves so cut side is facing up. Brush with miso glaze and place back in oven for 5 min. Turn up the oven to broil and place the pan 8-10” from the element. Broil until glaze bubbles and begins to char slightly, 5-7 min. Remove and serve sprinkled with toasted sesame seeds and chopped cilantro or green onions.
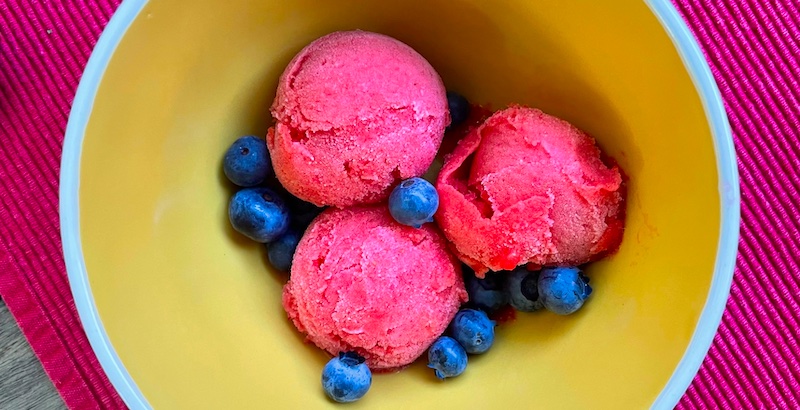
I'm sure some sage has written wise words correlating adversity with opportunity and growth. And you would be well within your rights to ask why I'm bringing this up in a post that's ostensibly a recipe for strawberry sorbet, and the answer is this: When Dave developed lactose intolerance in his early 40s we were devastated. As I wrote at the time:
It was a very bad day. One of those days that forever changes you. A day that delineates a definite "Before" and "After." The life-altering occurrence? My husband found out he was lactose intolerant. And, no, not just the "take a Lactaid pill and have some cheesecake anyway" kind of lactose intolerant, but the kind where it's inadvisable to partake of butter, fresh cheeses or any product containing milk without risking...ahem...shall we say "explosive repercussions."
As Joni Mitchell wrote: "You don't know what you've got till it's gone."
It led to a complete rethinking of our very profligate and, frankly, thoughtless use of dairy in everything from our morning toast to creamy casseroles to buttery pastries and desserts. Store shelves today proudly proclaim their products to be "dairy free" and "vegan," with lactose-free butter, milk and cheeses in stock almost everywhere. Even restaurant menus now offer dairy-free options and label entrées "DF" or "V," but thirty years ago it meant switching to margarine and tofu-based simulacra of our beloved dairy products.
And you could pretty much rule out a romantic date night—the machinations involved in trying to ascertain what was and wasn't available, the wait staffs' eyes rolling around their heads and a whimper of "I'll have to check with the kitchen" uttered in complete helplessness, then ordering something and hoping desperately they'd got it right made for a less-than-relaxing experience.
But the upsides were legion, as well. One of the big reasons for Dave's dive into sourdough—yes, it predated the nation's "discovery" of this ancient technique during COVID, particularly by middle-aged white men—was because reading paragraph-long bread labels on shopping trips was taking way too long and the "may have been produced in a facility using dairy" descriptions felt too risky. I could also list benefits like discovering the infinite and delicious permutations of olive oil cakes, and the concomitant escalation in our use of (organic) olive oil, or, to get back to the point of this post, the discovery of fresh sorbets that were like the creamier, less icy Italian versions our Cuisinart ice cream maker produces.
No machine? No problem!
With local fruit season just beginning to burst onto the scene, you can count on several berry and stone fruit sorbets appearing as luscious cappers to backyard soirées here at Good Stuff NW. For instance, this strawberry version is easy, taking less than an hour to pop into freezer and then three or four hours to freeze.
Don't have an ice cream maker in your kitchen inventory? No problem! Read to the last part of the recipe below and check out how my friend Mary Bartlett made the incredible sorbet pictured on the left using just a whisk and her freezer.
Fresh Strawberry Sorbet
2 pints fresh strawberries 1 1/4 cups simple syrup (equal parts sugar and water, warmed and stirred until sugar is completely dissolved) 2 Tbsp. fresh-squeezed orange juice or a teaspoon or two of triple sec or Cointreau (optional)
Cool the simple syrup in the refrigerator.
Put the rinsed, stemmed and halved strawberries into a food processor or blender with a quarter cup of the simple syrup and blend until smooth. Pour the mixture into a larger bowl. Mix in the rest of the simple syrup (or to taste). Mix in the orange juice or booze, if using. Pour into an ice cream/sorbet machine and follow manufacturer’s directions. Freeze for a few hours before serving.
No ice cream machine? No problem! My friend Mary Bartlett said: "Follow the instructions, make the base and put it in a bowl that will go into the freezer. Place the bowl in the freezer. After one hour, using a whisk, stir the mixture. (Pro tip: Keeping the whisk in the freezer between stirrings will help speed the process along.) Repeat this hourly for about 4 to 6 hours.
Photo of blue bowl and hydrangeas by Denise della Santina. Photo of sorbet in china cups by Mary Bartlett.
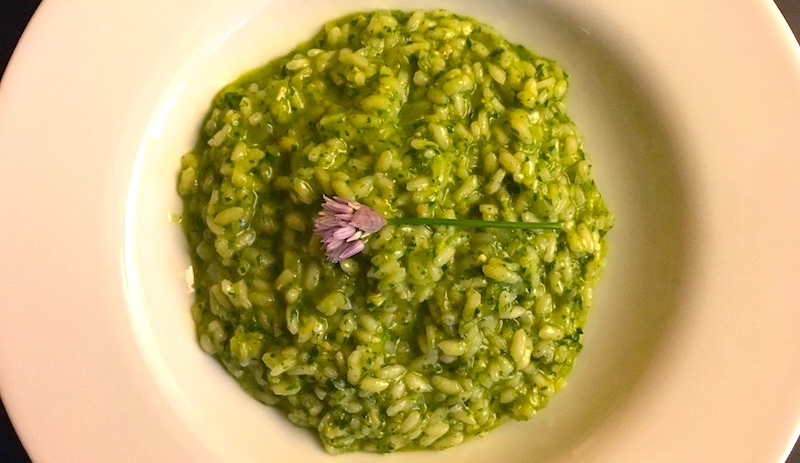
I first saw this spectacular dish years ago among the drool-worthy photos at Portland's late, lamented Florentine outpost, Burrasca, and was intrigued with its verdant green color and creamy texture. You see, we eat a lot of risotto around here, since it's easy to adapt to whatever you have in your pantry or vegetable bin—it's quick, around twenty minutes cooking time—and, in summer, doesn't heat up the kitchen. Summer is also when fresh herbs are plentiful in gardens and at farmers' markets.
Plus, if you make it in the summer and get too warm standing in front of the stove, you are allowed a glass (or more, depending on how quickly you drain it) of a chilled white or rosé.
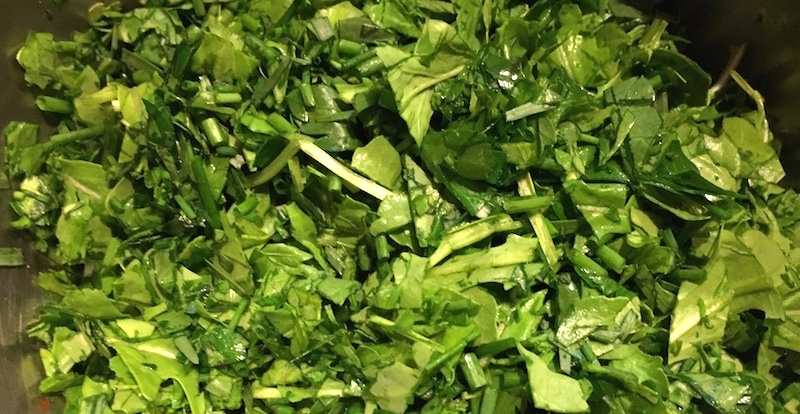
For this particular recipe, I had on hand a fair amount of arugula and parsley I'd bought at the farmers' market over the weekend, as well as chives and tarragon from the garden, but you can use any greens that come to hand, like spinach, chard, sorrel, kale, chervil, dill, basil or the like. Eminently flexible, you can design your own flavor profile—I'd only caution you to not overload the mixture with stronger-tasting herbs, but let them weave in and out of the milder ones.
Risotto Alle Erbe/Herb Risotto
3 Tbsp. olive oil 2 Tbsp. butter or margarine Half of a medium yellow onion, chopped fine 3 cloves of garlic, minced 2 c. arborio or other short-grained rice 1 c. white or rosé wine 5 c. chicken stock 3 c. mixed green herbs (I used arugula, parsley and chives), chopped fine 2 Tbsp. tarragon, chopped fine 2 c. parmesan or romano, grated fine
Heat olive oil and butter over medium heat in large saucepan until it shimmers, then add onion and sauté until translucent. Add garlic and sauté briefly, then add rice and sauté for 2 minutes, stirring constantly to prevent sticking.
Add wine and stir until it is absorbed into the rice, then begin adding stock a ladle-full at a time, stirring frequently, allowing the stock to be absorbed before adding more (I keep the stock warming in a pot on a nearby burner—it absorbs much more quickly when it's hot). When about half the stock has been used, add the finely chopped herbs and stir them in until they wilt slightly, then continue adding the stock until the rice is slightly chewy and the risotto has a creamy texture. Add 1/2 c. parmesan and stir to combine. Serve immediately.
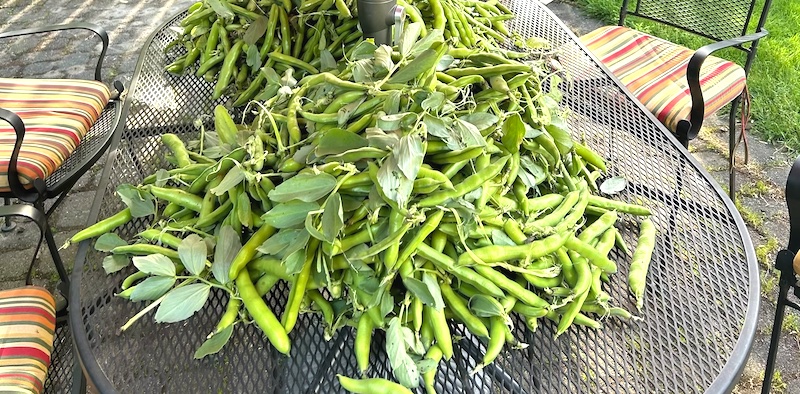
My neighbor Bill has a backyard vegetable garden that rivals some of our small-acreage farmers. He's currently havesting fava beans, snap and shelling peas, lettuces, herbs and radishes, with several beans, all sorts of peppers, Astiana tomatoes, carrots, berries, figs, cucumbers, shiso, basil and squashes in the queue—there are undoubtedly others, too, but who can keep track?
He and his partner in crime, Jen, are both teachers and spend much of the summer pickling, preserving and freezing the bounty from their back yard, pulling out jars and bottles that tide them over throughout the winter months. Fortunately for me, they're generous to a fault and live just two blocks away.
Above is his second harvest of fava beans. He shared some of the first picking, which I added to a salad under a gorgeous filet of grilled salmon, then he asked if I could help out with this second massive haul. My answer was something akin to "Hell yes!" and I rushed over with bag in hand, coming home with at least five pounds of pods.
Bill had mentioned making risotto with some of the beans from his first picking, so since it was a mild spring evening I decided to follow suit. After doing some research online, I decided to eschew the suggestions combining favas and asparagus and focus instead on the favas themselves, accented by a bit of Dave's smoky bacon and some of the savory Cretin mint from Alice Doyle at Log House Plants in Cottage Grove.
Fresh Fava Bean Risotto
4 lbs. fava bean pods 1/4 lb. bacon, cut in small 1/4" cubes 2 Tbsp. olive oil 1/2 medium onion, finely chopped 4 cloves garlic, finely minced 2 c. arborio or other short-grained Italian rice 1 c. dry white wine 4 c. chicken broth 1 c. Pecorino Romano, finely grated 1 c. Parmigiano Reggiano, finely grated 1/2 c. (1 stick) frozen butter, cut crosswise into quarters 2 Tbsp. mint leaves, finely chopped Salt to taste
Bring a medium saucepan full of water to a boil and salt the water. While it heats, shuck the fava beans into a mixing bowl and discard the pods. When the water boils add the beans to the pot. When it returns to a boil, cook for three minutes, drain and submerge in ice water. When they cool, drain again and remove outer casings from the largest pods (or about 1/4 of the total). Set the peeled pods aside. Place the remaining unpeeled beans in a food processor or blender and process, adding just enough water to make a smooth purée. Set aside.
Heat the stock in a medium saucepan and keep warm over low heat.
Place the bacon in a large saucepan or risotto pot and fry over medium heat until crispy. When it's almost crisp, add the olive oil and heat for a few seconds, then add the onion and garlic to the pan and sauté until tender. Add the rice and stir to combine.
When the rice begins to get hot and crackle, add the white wine and stir gently until it's absorbed. Then begin adding the hot broth a ladle at a time, stirring gently and adding another ladle of stock as it absorbs. Repeat until the rice is almost done (it will be al dente but not crunchy), stir in the fava purée and allow it to come to a simmer for three minutes. Add the cold butter and a heaping cup of the grated cheeses and stir vigorously to emulsify the butter. Check for salt adding as needed.
I like to serve the risotto in the pan with a ladle, scattering the peeled favas over the top with the mint and grated cheese, though for a "company dinner" you might want to plate it in individual wide bowls garnished with the peeled beans, mint and cheese. (Make sure to serve plenty of grated cheese on the side!) A salad of soft lettuces is ideal to serve with this risotto, especially with my Sweet Red Wine Vinaigrette dressing.
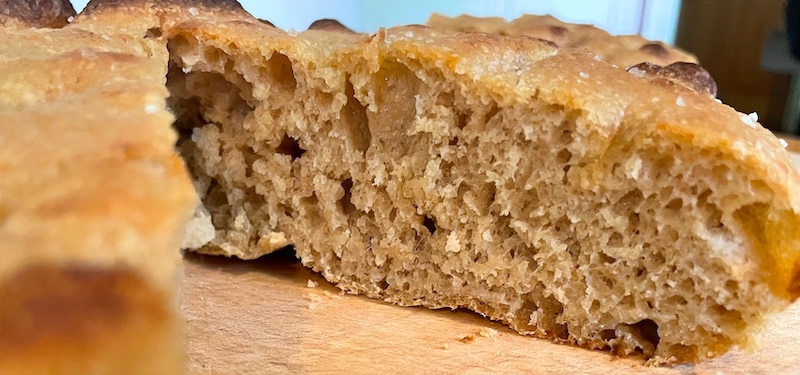
Crispy on the outside, pillowy inside, it's great for dipping in olive oil as is or for sandwiches!
Lately, he's been playing around with different focaccia recipes, and pulled out one (again from King Arthur) where he substituted his sourdough for the yeast it called for. With a couple of modifications to the original recipe, we think he's come up with a real winner!
290 grams fed and active starter that is half flour and half water (see Note) 215 grams high-gluten flour (I used Chimacum hard red bread flour) 9 grams fine sea salt 1 teaspoon granulated sugar 139 grams water at about 80º 18 grams extra-virgin olive oil
To oil the baking pan, you’ll also need a bit more olive oil, and for sprinkling on top you’ll need about 2 Tablespoons of extra-virgin olive oil and a half-teaspoon to a teaspoon of coarse or flaky sea salt.
Mix the starter, water and 18 grams of oil in a large bowl to break up and disperse the starter. Whisk the flour, salt and sugar in a separate bowl, then add to the liquids and mix until completely combined. Cover and set aside.
After 15 minutes. uncover and do a set of bowl folds: With a wet hand, reach under an edge of the dough and grab some, stretch it up and pat it onto the center of the dough. Give the bowl a little turn and repeat the stretch. Repeat for a total of eight to 12 times. (There’s a good demonstration of bowl folds at King Arthur.) Cover and set aside.
After 15 minutes, wet your hand and repeat the bowl folds.
After 15 minutes, repeat.
After 15 minutes, repeat for fourth set of bowl folds..
Cover and let rise until doubled in size (probably two to four hours, depending on the temperature of the room and the activity of the starter).
When dough has doubled, prepare a 10-inch cast-iron pan or a 9-inch-by-9-inch baking pan: Lightly oil the bottom and sides of the pan. Line the bottom and sides of the oiled pan with parchment, leaving enough parchment to extend enough above two opposite sides so that you’ll have handles to remove the loaf from the pan partway through the baking. Generously oil the dough side of the parchment.
Gently place the risen dough into the pan, then with the help of a bowl scraper and using your hands as paddles, turn the dough over to oil both sides. Gently stretch the dough toward the edges of the pan. Cover and let rise until it is pillowy and has risen almost to the top of the pan.
Toward the end of the rise, preheat the oven to 475º with a rack a third of the way from the top and a third of the way from the bottom.
When the dough has risen, dip your fingers in oil and gently stick your fingers in the dough so they touch the bottom, then pull them out. Do this all over the dough until it is covered in dimples. Drizzle a tablespoon of oil over the dough. Sprinkle with a half teaspoon to a teaspoon of the coarse or flaky salt.
Bake in the lower rack for 15 to 18 minutes, until the high spots have browned and the lower spots are very lightly browned. If the bread isn’t browned enough, move the pan to the upper rack and broil for a minute, watching closely to avoid burning.
Remove from the oven and turn the oven off. Lift the loaf from the pan using the parchment handles. Place the loaf directly on the lower rack and leave in the oven for five minutes until the sides are lightly browned and the loaf is crisp.
Remove from the oven and place on a rack to cool.
Note: This recipe is basically the King Arthur recipe but eliminating the yeast and using sourdough starter instead. Thus the 290 grams of starter is the total I had on hand after feeding; since it’s 100 percent hydration, I deducted 145 grams from the 360 grams of flour in the KA recipe and 145 grams of water from the 284 in the recipe. Changing from yeast to sourdough also adds to the rising time for the dough.
It's been almost 20 years since my mother passed away, and a friend's special request for my Mom's quintessential summer salad brought memories of her flooding back, as they do whenever I make one of the many family favorites still on rotation in our house. This post from 2009 summed it up.
My mother was a good, if not natural cook, doing the not-inconsequential job of feeding her family of five staples like Spanish rice, tuna casserole and goulash. Her own mother was not really interested in cooking, and growing up in North Powder, Oregon, a teeny Eastern Oregon town of 400, hadn't provided much in the way of adventurous dining. She did occasionally venture into unknown territory, which brought exotic foods like tacos, made with store-bought packets of Taco Mix and fried tortillas, to our dinner table.
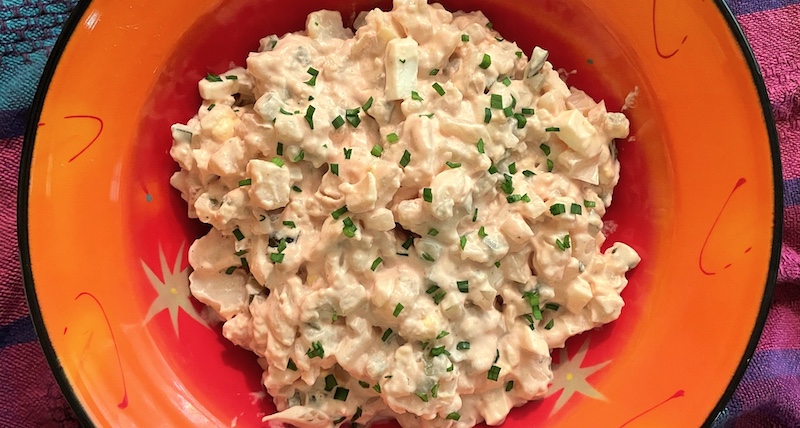
There were many recipes of hers I made sure to copy down before I left home. Her pineapple carrot cake, favorite holiday cookie recipes and, probably her pièce de resistance, a fabulous all-American summer favorite, potato salad. As a staple of picnics and family gatherings, I'd helped make it so many times it was practically muscle memory, and its still an often-requested, must-have side dish at summer get-togethers.
Now, everyone has their own definitive version of potato salad, with the accompanying debates about the merits of mayo versus salad dressing, celery or not. My mother's called for russets (no Yukon golds for her, mister), pickle brine as the dressing's secret ingredient with a slightly pink tinge from what we referred to as God's own condiment, ketchup.
There's nothing that reminds me of her more than when I dig into this on a warm summer's day.
Mom's Potato Salad
Dressing: 2 c. mayonnaise 1/2 c. ketchup 2 tsp. worchestershire 2 tsp. dried basil 1/8 tsp. garlic powder 1/2 tsp. celery salt 1/2 tsp. dried thyme 1/3 c. pickle brine 1 tsp. salt 1/4 tsp. pepper
Put unpeeled potatoes in a large saucepan or Dutch oven and cover with water. Place on stove and bring to a boil. Cook until potatoes are tender but not mushy. Drain and cool (can be made ahead).
While potatoes cook, make dressing. Put all ingredients in a bowl and stir to combine.
Slice cooled potatoes into 1" square and 1/8" wide pieces (or bite-sized). Chop onion and pickles fine. Chop eggs. Put in a large bowl, pour dressing over top and fold it in (don't stir or the potatoes will break up too much) until thoroughly combined. Place bowl in refrigerator and let sit for a couple of hours so flavors have a change to mingle.
Serves 10-12. This recipe makes a huge batch, so you may want to halve it.
My friend Claudia Lucero, founder of home cheese-making empire Urban Cheesecraft, sent out this recipe in her newsletter that begged to be shared. I asked, and she agreed!
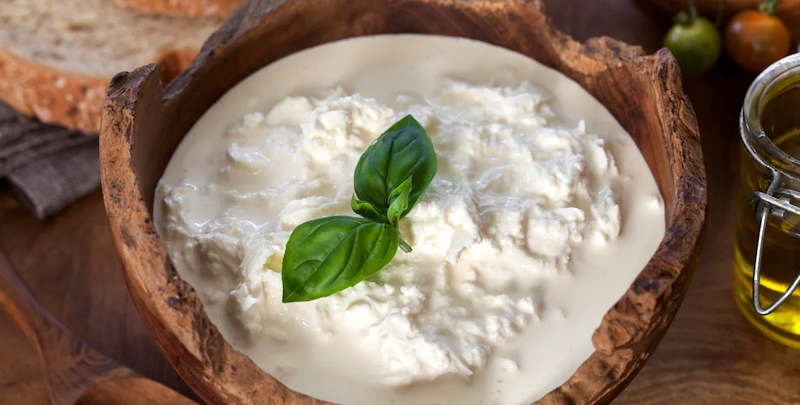
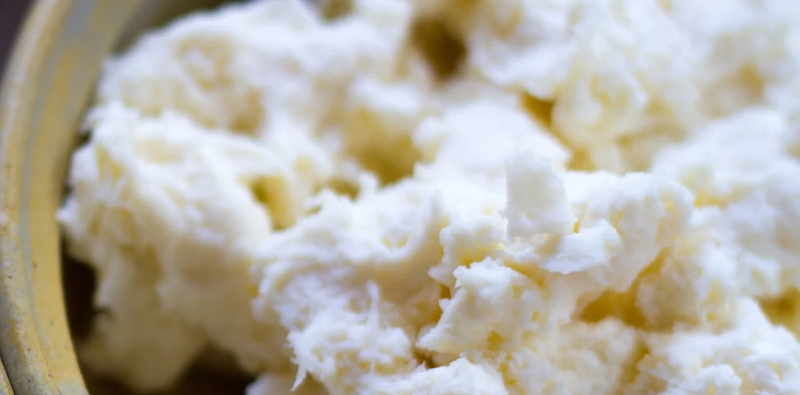
Ever drool over a recipe featuring burrata only to find that you can't actually buy burrata anywhere near you? You're not alone, but there's great news—you can enjoy the luscious, creamy heart of burrata by making stracciatella, the rich, silky filling inside with just two ingredients.
What is Stracciatella?
Surprise! If you have tasted burrata, you have already tasted stracciatella! That's because stracciatella is the lesser-known creamy filling inside burrata—the part that makes everyone ooh and ahh after slicing a tender burrata pouch. The part that makes burrata more luscious than fresh mozzarella. It is simply made by combining torn shreds of fresh mozzarella with rich cream and a sprinkle of salt. That's it.
Adore burrata? Then you'll love how easy it is to make stracciatella!
Some people consider stracciatella a fresh Italian cheese, others argue that it is technically not a cheese because we're just mixing mozzarella with cream. As a cheesemaker, I get that, but no one likes to hear, "well, actually" when they're just enjoying something delicious! Besides, I also make dairy-free "cheese" so clearly I am not ruled by tradition and technicalities. If burrata can be called a fresh Italian cheese, then so can stracciatella!
Fun fact: In Italian stracciatella literally means “little shred, or little rag.” I like to call them "ribbons"—it's a little more appetizing. Regardless, shreds or rags are perfect descriptions of how the mozzarella is torn into pieces before being bathed in cream.
This also explains why there is a stracciatella soup (ribbons are created when a mixture of egg and cheese is stirred into hot soup) and stracciatella ice cream (drizzles or ribbons of melted chocolate that become chocolate flecks when the chocolate freezes and is broken up and stirred into the ice cream).
Burrata, Mozzarella, and Stracciatella: What’s the Difference?
I'm sure you are getting this but just to be clear, these three cheeses are deliciously related, but each has its own character. Here’s a quick breakdown:
Mozzarella. A fresh, semi-soft cheese made with the pasta filata (stretched curd, or "spun paste") technique. Traditionally made with water buffalo milk in parts of Italy (mozzarella di bufala) but often cow’s milk elsewhere (fior di latte). Used for pizza, salads, and appetizers.
Stracciatella. Made by tearing fresh mozzarella into shreds and mixing with heavy cream and salt. It’s soft, rich, and spoonable and a perfect representation of burrata that has already been cut into. Can be eaten on toast, in pasta, or as a substitute for burrata in any serving suggestion.
Burrata. A fresh, thin mozzarella pouch filled with stracciatella. It's like a dumpling for cheese lovers! Originated in Puglia, Italy, as a way to avoid waste (yesterday's mozzarella or string cheese knots called nodini). Meant to be eaten fresh, often with tomatoes, bread, and olive oil.
Burrata's Clever Zero-Waste History and Connection to other Cheeses of the World
All three of these cheeses trace their roots to southern Italy, where fresh, perishable cheeses are a staple. Burrata was invented in the early 1900s in Puglia as a clever way to use leftover mozzarella scraps.
Tear fresh mozzarella into shreds, drench in cream, add salt. That's it!
The technique of pasta filata, or stretched-curd cheesemaking, dates back even further and can be seen in other cultures. It’s the same process used to make classics like provolone and caciocavallo in Italy but also quesillo (queso Oaxaca) in Mexico and the Syrian string cheese jibneh mshallaleh, sometimes sold in Middle Eastern markets in the U.S. as tresse.
Why Make Stracciatella at Home? So Many Reasons.
You need burrata and can't find it.
You make excellent mozzarella and want to up your game!
You make OK mozzarella and you'd rather tear it into this forgiving shape and allow the shreds to tenderize in the cream (bonus!).
You've actually made burrata with our kits or books but the messy sealing part frustrates you (it's true, that takes the most practice).
It’s delicious, quick and easy — ready in minutes.
You can customize your stracciatella with herbs, lemon zest, or spices and impress the heck out of your friends and family.
Simple Homemade Stracciatella Recipe
This recipe makes about 1 cup—enough to top crostini, or spoon over pasta, salad or pizza. Feel free to double or quadruple the recipe—you will wish you did.
Important: This will not work with American-style mozzarella. You know the firm, waxy stuff that can be shredded with a grater, nor with part-skim pre-shredded mozzarella, or with American string cheese. If you don't have an hour to make mozzarella, and can't find store-bought, fresh mozzarella in brine, use ricotta instead. The texture won't be quite right but it's tasty.
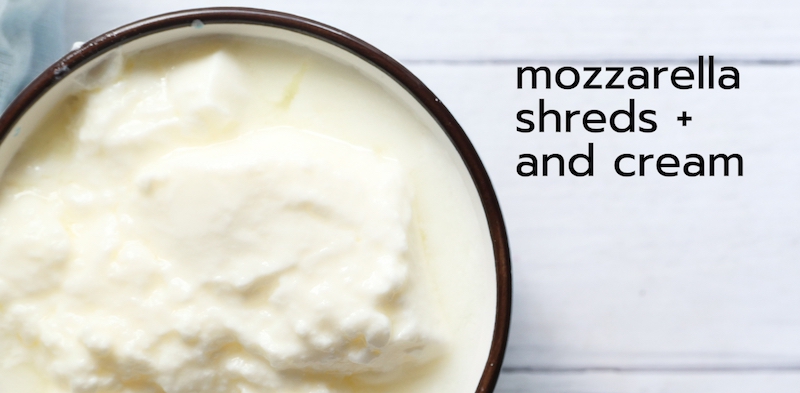
Ingredients: 1 ball of fresh mozzarella in brine (about 4-5 oz) or homemade mozzarella (see recipe) 1/3 c. heavy cream (also called heavy whipping cream) 1/8 tsp. sea salt, taste and adjust to taste Optional: Any flavorful bits you'd like, such as a sprinkling of pepper flakes or two teaspoons of fresh chives, torn basil, diced sundried tomatoes, etc.
Tear the milky soft mozzarella into small, thin shreds by hand. This is the original handmade way. (These days this is often done by machines so the filling can often look like ricotta.)
In a bowl, combine the shredded mozzarella, heavy cream, and salt. Toss gently to combine. The cream should drench the shreds so that they are still runny. You want it to be a little drippy when you grab a handful because some of it will absorb into the mozzarella shreds and tenderize them. (You can see this in my Instagram reel where I make stracciatella from homemade mozzarella.)
Taste and adjust salt if needed. Add any herbs, etc. you are using.
You can eat it right away but it will be more tender if you allow it to rest and meld for 5- 10 minutes at room temp. Like mozzarella and burrata, stracciatella is best eaten on the same day so you never (ideally) have to refrigerate it. But, real life, it's ok if you do. Just allow it to rest at room temp for 10-15 minutes before serving so the cream and cheese soften a bit and lose that fat-coagulating chill. You will taste the butterfat more fully and that's what we want with these simple, creamy cheeses. Note that the cream will continue to absorb into the mozzarella shreds and can turn them bitter over time. Eat it within 1-2 days.
Serving ideas:
Spoon onto grilled sourdough with olive oil and flaky salt.
The saying above was never more true. I've been waiting months for Dave to be satisfied enough with this recipe to share it with you all, and the time has finally arrived!
Regular readers will know that Dave relentlessly trolls baking websites, blogs and videos for ideas that he tries out on his willing victims, aka his family, and regularly hands out samples to friends, neighbors and postal carriers alike. (Just yesterday our mail carrier, Fred, who has been plied with the aforementioned samples, said we can text him any time to let him know if we have extras to get rid of.)
The journey of these scones started with a Genevieve Ko recipe in the New York Times for a favorite she'd had from an Alabama restaurant that they called orange rolls. What caught Dave's eye was that these didn't require yeast, multiple risings or refrigerating overnight, the better to put together for our usual late-morning breakfast. Describing them as "pretty okay" after a test run, Dave mused that it might be possible to rework them as scones, both to save time and get around the hassle of rolling out the dough, spreading the filling, rolling up the dough and slicing them—especially if you haven't had enough coffee yet.
If you've made his recipe for Orange Currant Scones, you know he's got that particular pastry nailed, so it took a few attempts at perfecting the dough-to-filling ratio to get the rise he wanted and keep the just-sweet-enough-but-not-too-sweet flavor profile we prefer.
So, finally, here it is—tadaaaaaaa—our new favorite morning pastry!
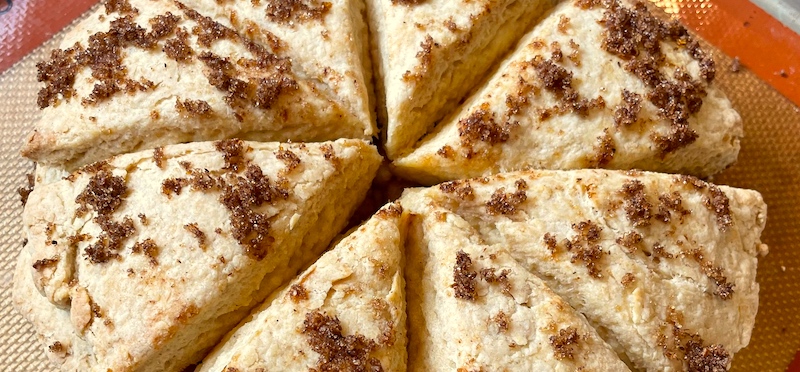
Dave's Orange Cinnamon Filled Scones
390 grams all-purpose (AP) flour (Dave used half AP and half sifted home-milled Camas Country Mill hard white flour) 3/4 tsp. fine sea salt 1 Tbsp. granulated sugar 1 Tbsp. baking powder 1/4-1/3 c. sour cream (see note below) 2/3-3/4 c. whole milk or half-and-half (see note below) 2 heaping Tbsp. brown sugar 1/2 tsp. ground cinnamon Zest of one orange 1 stick of butter (1/2 c.), very cold, cut into 1/4" cubes 1 large egg
Preheat oven to 350°.
Add the flour, sea salt, sugar and baking powder to a large bowl and lightly whisk. Pour into the bowl of a food processor.
Cut the very cold butter into 1/4" pieces and toss into the food processor with the flour mixture. Pulse for 7 to 10 seconds until the butter is in tiny pieces, approximately the size of fennel seeds.
Pour the flour mixture back into the large bowl.
Spoon the sour cream into the bottom of a one-cup measuring cup, then add milk or half-and-half enough to measure 1 cup. Whisk with a fork.
Break the egg into a small bowl and whisk with a fork.
Pour the milk mixture into the egg and whisk briefly until the yolk is thoroughly mixed in.
Put the brown sugar and cinnamon into a small bowl and mix together. Add the orange zest and mix again. You might have to rub it into the sugar and cinnamon mixture with your fingers.
Add the milk-egg mixture to the flour mixture and mix until all the dry ingredients are moistened and the dough can be formed into a mass. Knead three or four times. Cut the dough into two equal pieces. Flatten each piece into a circle about 8 inches in diameter (a rolling pin helps).
Spoon half of the cinnamon/sugar/zest mixture onto one of the dough pieces and spread it as evenly as you can. It’s OK to have some sparse spots. Layer the other flattened piece of dough on top of the first. Spread the rest of the cinnamon mixture on top as evenly as possible.
Place the assembled dough on a baking sheet lined with parchment. Cut like a pie into eight wedges (you don’t need to separate them).
Bake for 22-25 minutes, turning front-to-back halfway through, until a tester stuck into a couple of the wedges shows they are baked through.
 It led to a complete rethinking of our very profligate and, frankly, thoughtless use of dairy in everything from our morning toast to creamy casseroles to buttery pastries and desserts. Store shelves today proudly proclaim their products to be "dairy free" and "vegan," with lactose-free butter, milk and cheeses in stock almost everywhere. Even restaurant menus now offer dairy-free options and label entrées "DF" or "V," but thirty years ago it meant switching to margarine and tofu-based simulacra of our beloved dairy products.
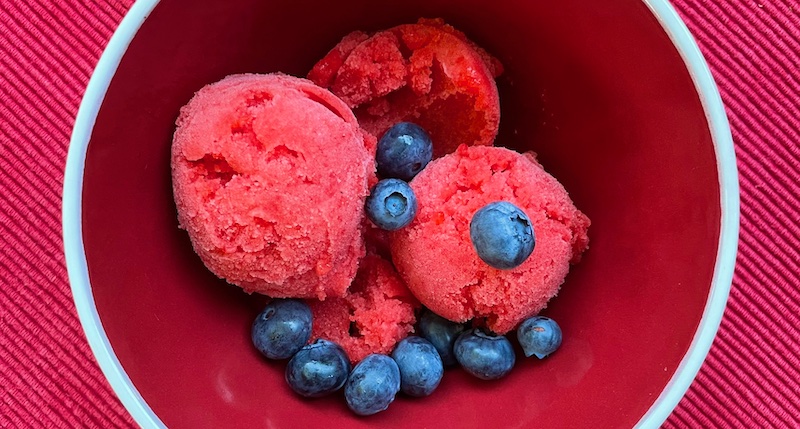 But the upsides were legion, as well. One of the big reasons for Dave's
 Plus, if you make it in the summer and get too warm standing in front of the stove, you are allowed a glass (or more, depending on how quickly you drain it) of a chilled white or rosé.
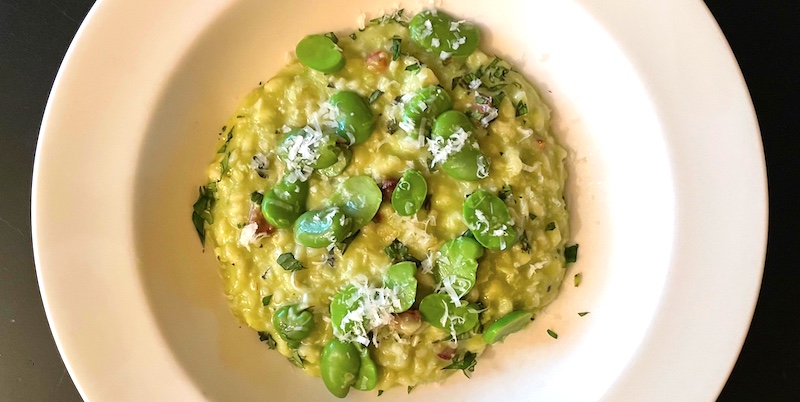
 Above is his second harvest of fava beans. He shared some of the first picking, which I added to a salad under a gorgeous filet of grilled salmon, then he asked if I could help out with this second massive haul. My answer was something akin to "Hell yes!" and I rushed over with bag in hand, coming home with at least five pounds of pods.
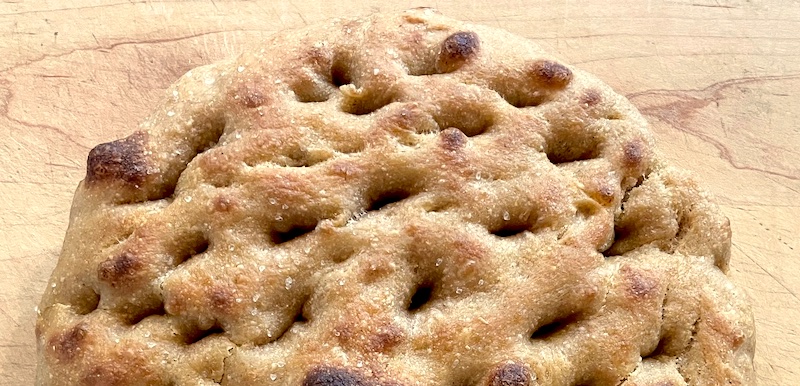

 The journey of these scones started with a Genevieve Ko recipe in the New York Times for a favorite she'd had from an Alabama restaurant that they called orange rolls. What caught Dave's eye was that these didn't require yeast, multiple risings or refrigerating overnight, the better to put together for our usual late-morning breakfast. Describing them as "pretty okay" after a test run, Dave mused that it might be possible to rework them as scones, both to save time and get around the hassle of rolling out the dough, spreading the filling, rolling up the dough and slicing them—especially if you haven't had enough coffee yet.